
Square-1: The Basic Lars Method
Basic Lars for Square-1: cubeshape, orientation, permutation, parity, and middle-layer alignment.
Square-1 has eight corners spanning 60° each and eight edges spanning 30° each. Slice turns move pieces between the two layers, changing both their piece counts and the puzzle’s shape. This tutorial follows Basic Lars: restore cubeshape, separate the top and bottom colors, then permute the pieces.
Notation and diagrams
Hold the puzzle with the short section of the middle layer at the front left. Keep your left hand on that half. U is the upper layer and D the lower layer. In each pair of diagrams, U is on the left and D on the right. Both are viewed from above, as though you could see through the upper layer. Each layer diagram marks the front with F ↓ and the middle-layer slice direction with a dashed line.
| Notation | Action |
|---|---|
(a,b) | Turn U by a units of 30° and D by b units of 30° |
| Positive / negative | Positive U is clockwise from above. Positive D is clockwise from below, so it appears counterclockwise in these D diagrams |
/ | Turn the right half through 180°; both layers must line up with the middle-layer cut |
U, D | (3,0), (0,3): a 90° turn of that layer |
', 2 | Reverse direction, or turn twice: U' = (-3,0) and U2 = (6,0) |
M2 | The sequence (1,0) / (-1,-1) / (0,1) in this tutorial |
You may adjust U and D to match a case before starting its algorithm; keep the grip fixed during execution.
1. Cubeshape: build a six-corner star
First collect six of the eight corners in the bottom layer, with no edges between them. This makes a six-corner star. The other two corners and all eight edges remain in the upper layer.
Keep the existing run of corners to the left of the bottom-layer cut, with one end against the cut. Turn U to place another corner in the right half so that a slice brings it beside the preserved run. After joining it, adjust D to keep the longer run on the left. Build a run of three corners and move it to the bottom left half. Preserve that half while using only U turns and right-half slices to collect three consecutive corners in the upper layer. Bring that group down with a slice to complete the star.
With the star below, count the edges in the two gaps between the upper layer’s two corners. The five possibilities are 4+4, 3+5, 2+6, 1+7, and 0+8. Adjust U and D until the corners and cut lines match the relevant diagram, then execute its algorithm.
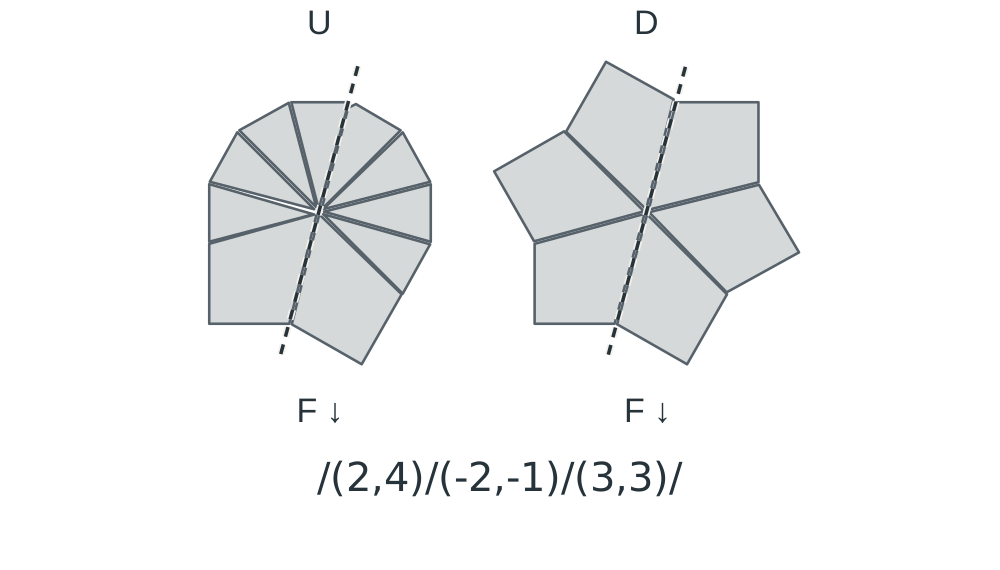
/ (2,4) / (-2,-1) / (3,3) /
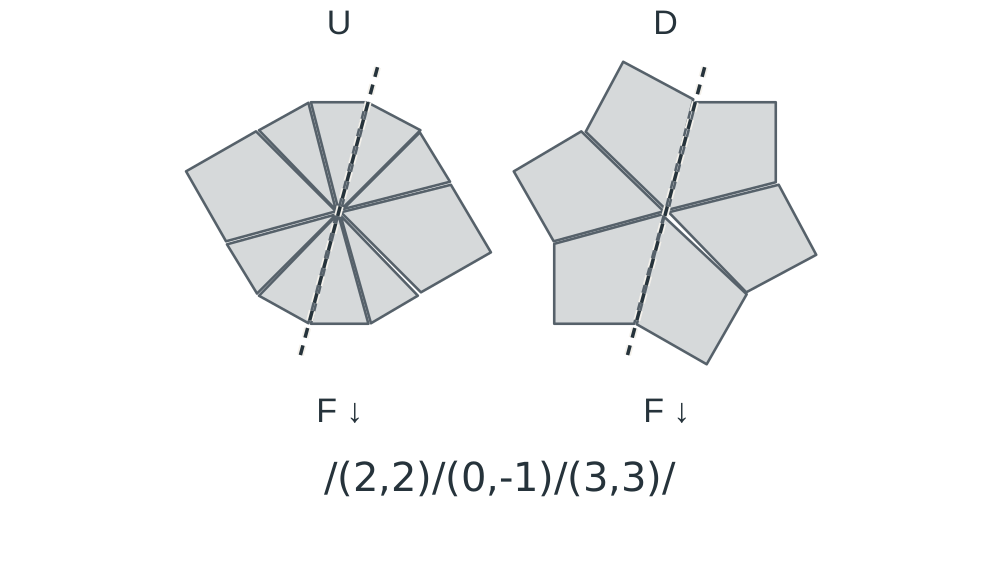
/ (2,2) / (0,-1) / (3,3) /
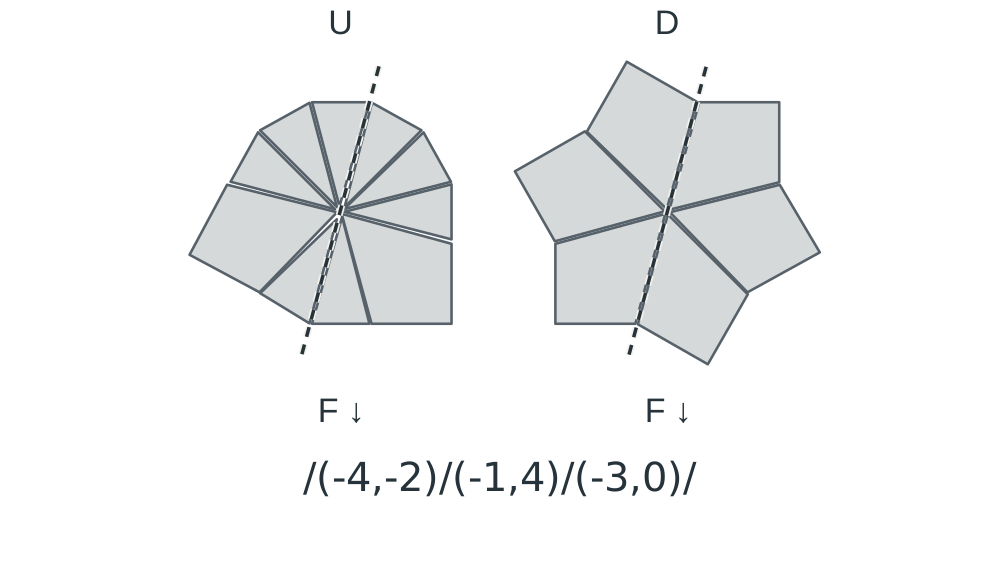
/ (-4,-2) / (-1,4) / (-3,0) /
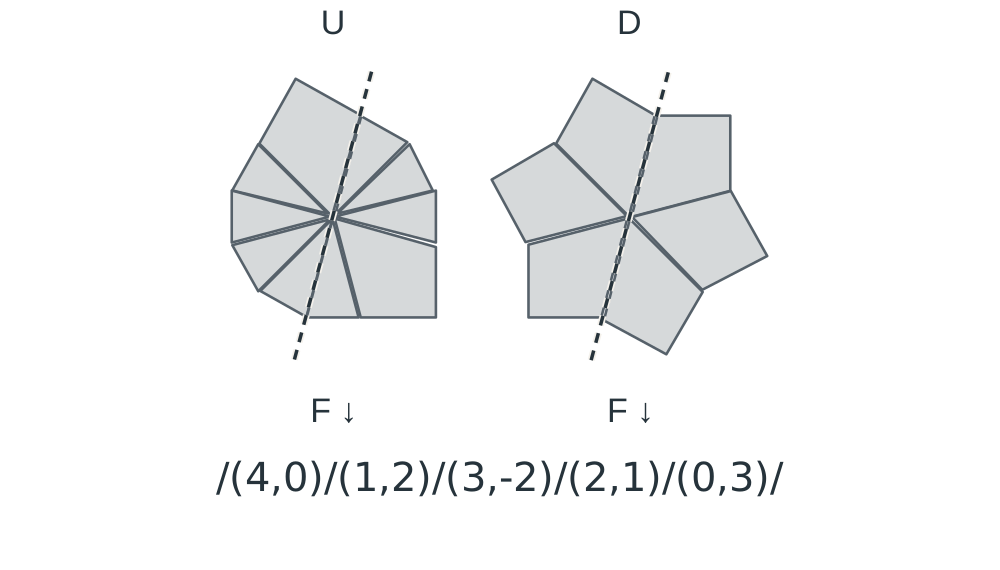
/ (4,0) / (1,2) / (3,-2) / (2,1) / (0,3) /
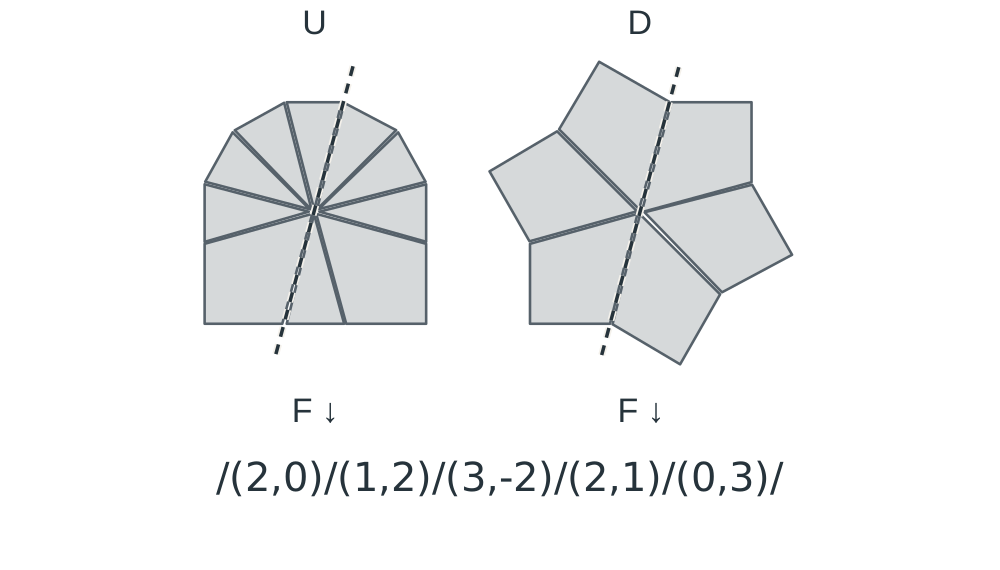
/ (2,0) / (1,2) / (3,-2) / (2,1) / (0,3) /
2. Separate the corner colors
Choose a top and bottom color; the diagrams use yellow above and white below. Move the four top-color corners into U and the four bottom-color corners into D. Their side colors will be arranged later.
Count the misplaced corners in each layer. For one per layer, adjust U and D to match the first diagram and use the single-corner exchange. For two per layer, place them together in the pictured half and use the second sequence. With more misplaced corners, exchange a group first, then recognize the remaining case.
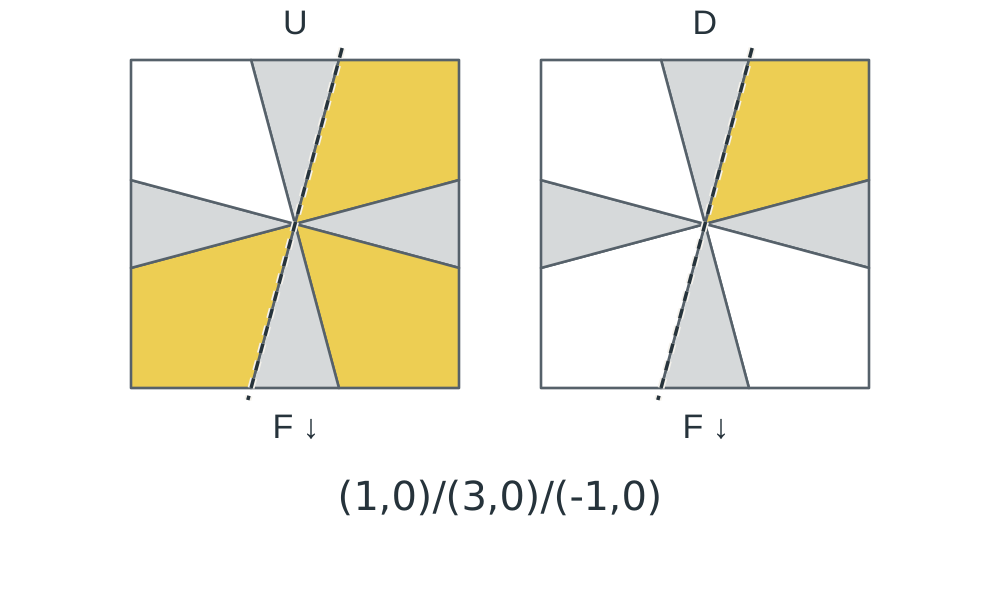
(1,0) / (3,0) / (-1,0)
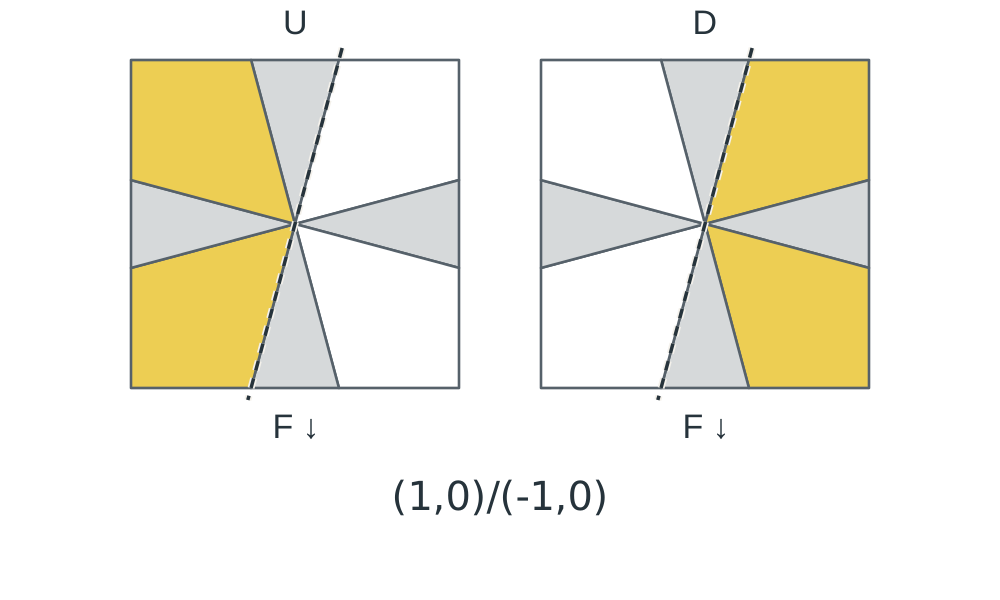
(1,0) / (-1,0)
3. Separate the edge colors
Move top-color edges into U and bottom-color edges into D while preserving the corner colors. When each layer has one misplaced edge, use the single-edge exchange. With two misplaced edges per layer, first try to align them with the double-edge case.
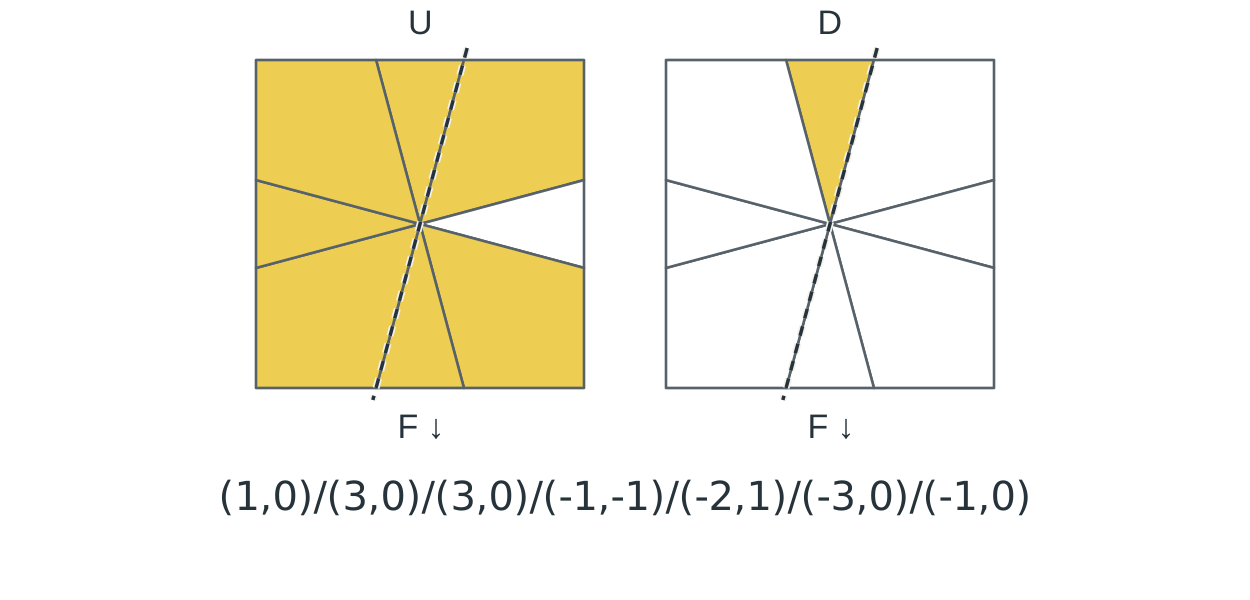
(1,0) / (3,0) / (3,0) / (-1,-1) / (-2,1) / (-3,0) / (-1,0)
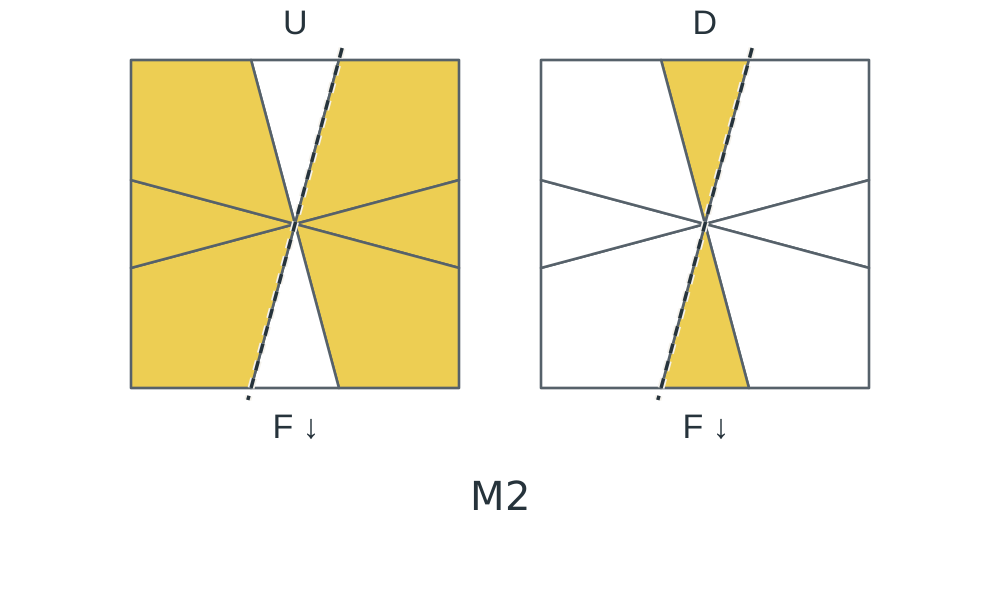
M2
4. Permute the corners
Compare the side stickers of adjacent corners. A matching pair forms a set of headlights. Adjust U and D to match the exchange positions below, then use the algorithms to arrange the corners within their layers.
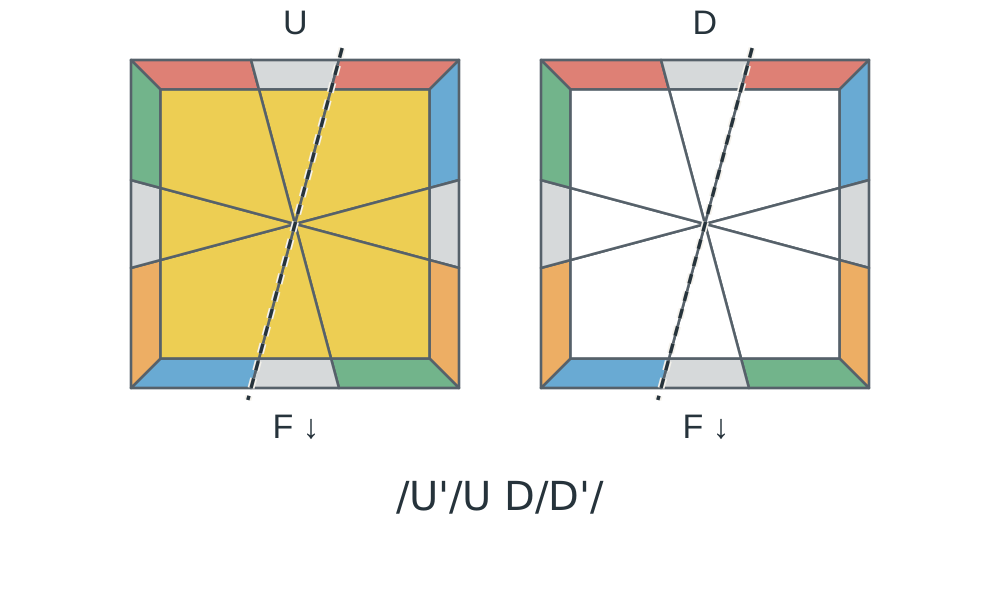
/ U' / U D / D' /
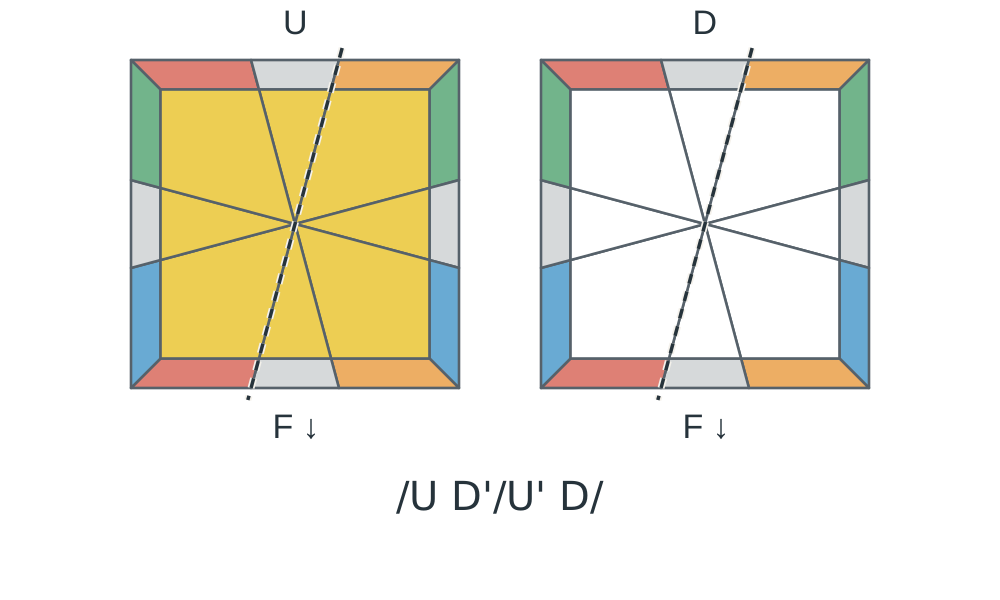
/ U D' / U' D /
If neither case matches directly, place an existing set of headlights on the left or right, execute the first algorithm, and recognize the new case.
5. Permute the edges
The two neighboring corners determine each edge’s destination. Use the adjacent-edge or opposite-edge exchange shown below.
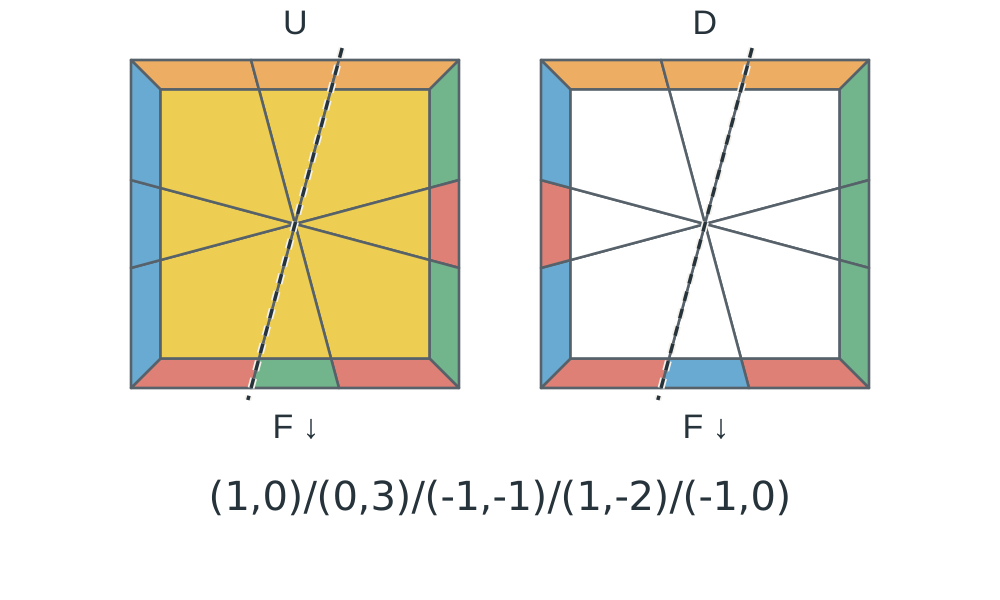
(1,0) / (0,3) / (-1,-1) / (1,-2) / (-1,0)
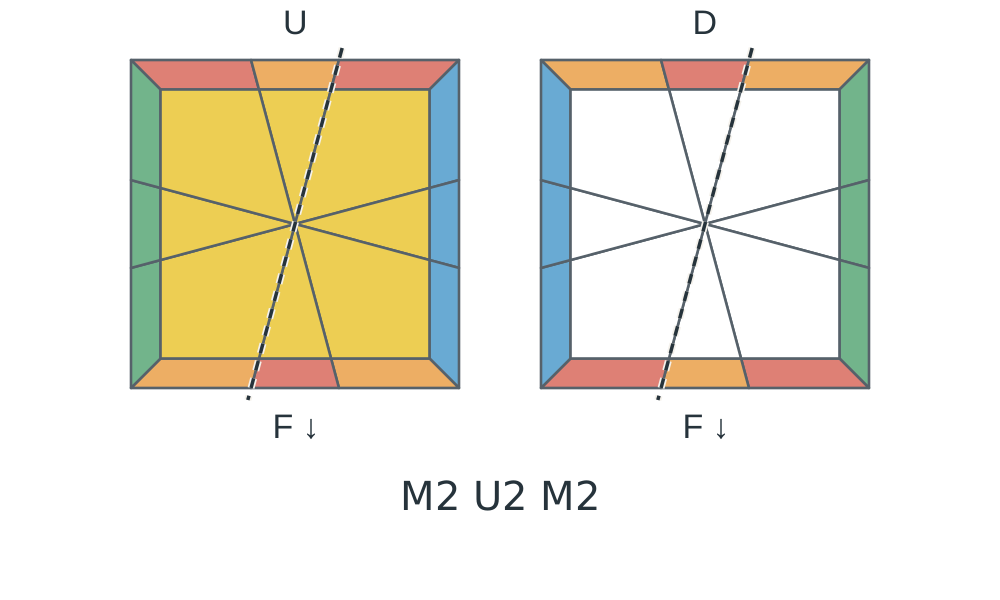
M2 U2 M2
6. Handle parity
After cubeshape, Square-1 can have a two-edge exchange that cannot occur on its own on a 3×3. Put the remaining two edges in the positions shown by the colors and execute the following algorithm.
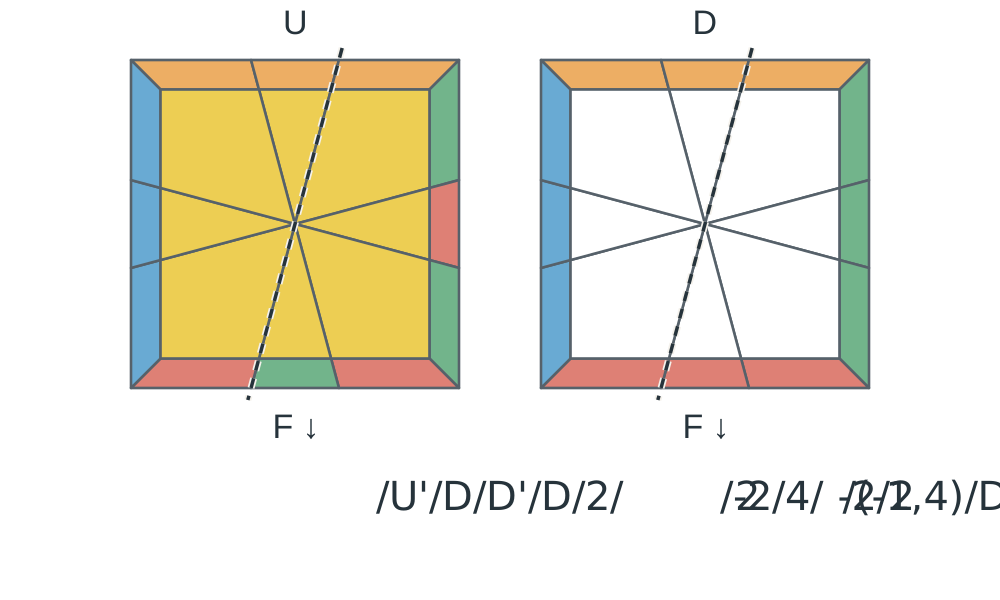
/ (-3,0) / (0,3) / (0,-3) / (0,3) / (2,0) / (0,2) / (-2,0) / (4,0) / (0,-2) / (0,2) / (-1,4) / (0,-3) / (0,3)
7. Restore the middle layer
Keep the short section on the left. If the two middle-layer halves have different orientations, use the sequence below.
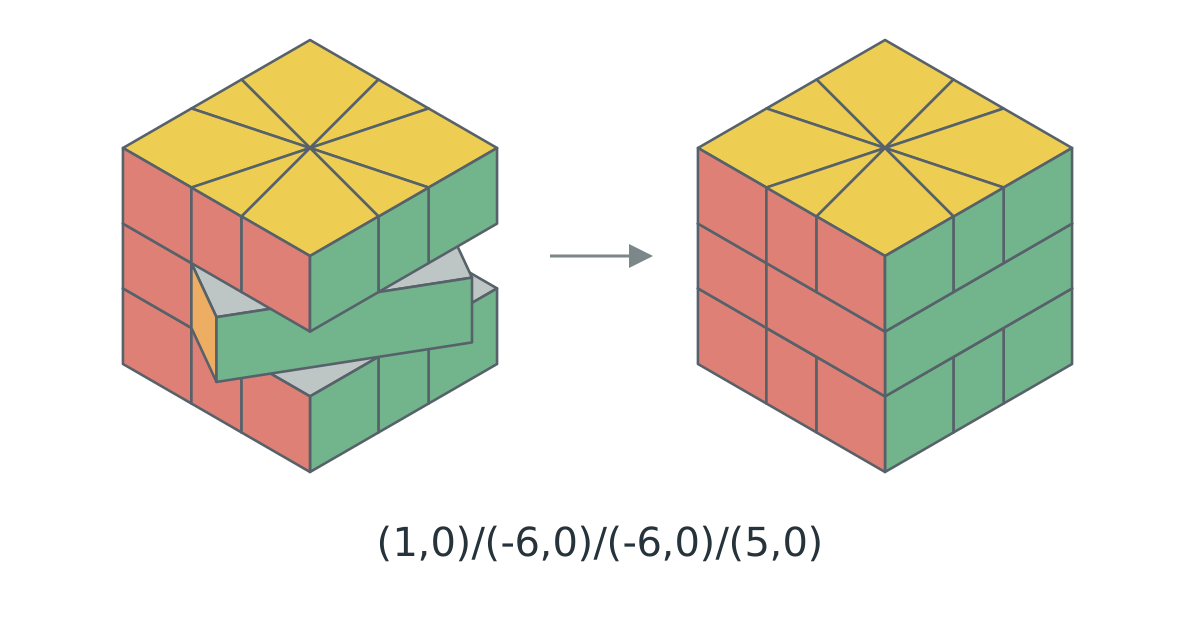
(1,0) / (-6,0) / (-6,0) / (5,0)
Further practice: shorter cubeshape routes
Once the star route is familiar, recognize useful shapes along the way and solve them directly.
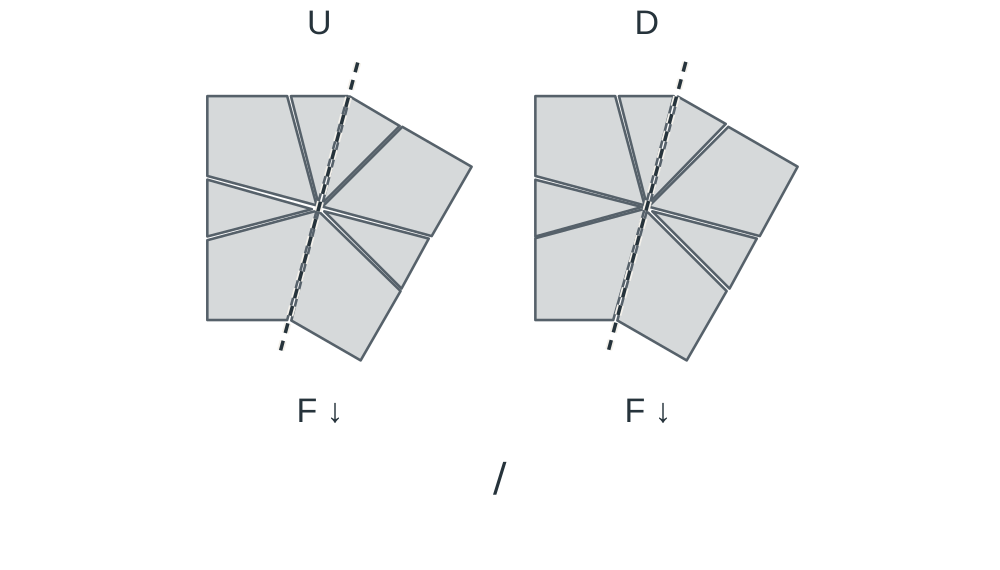
/
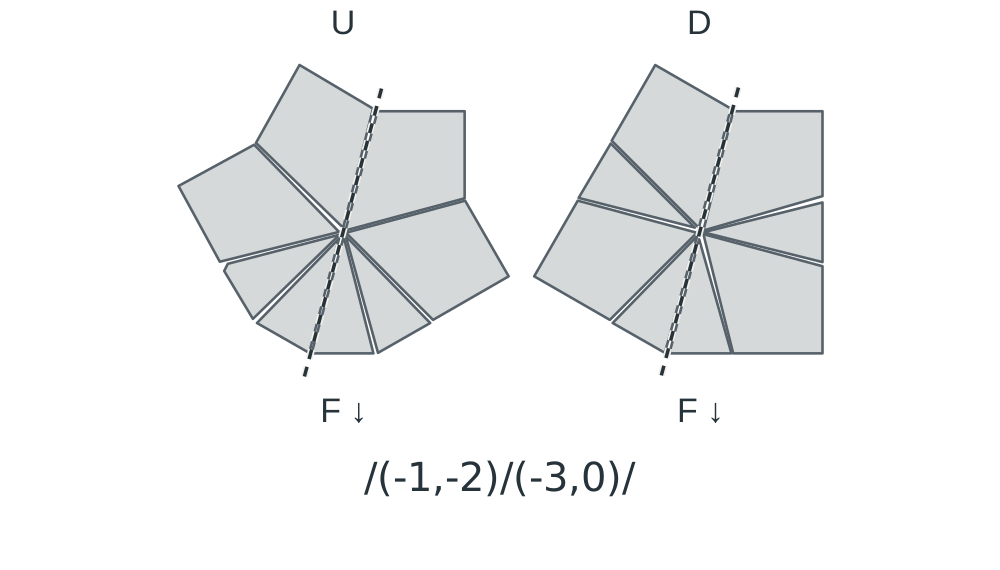
/ (-1,-2) / (-3,0) /
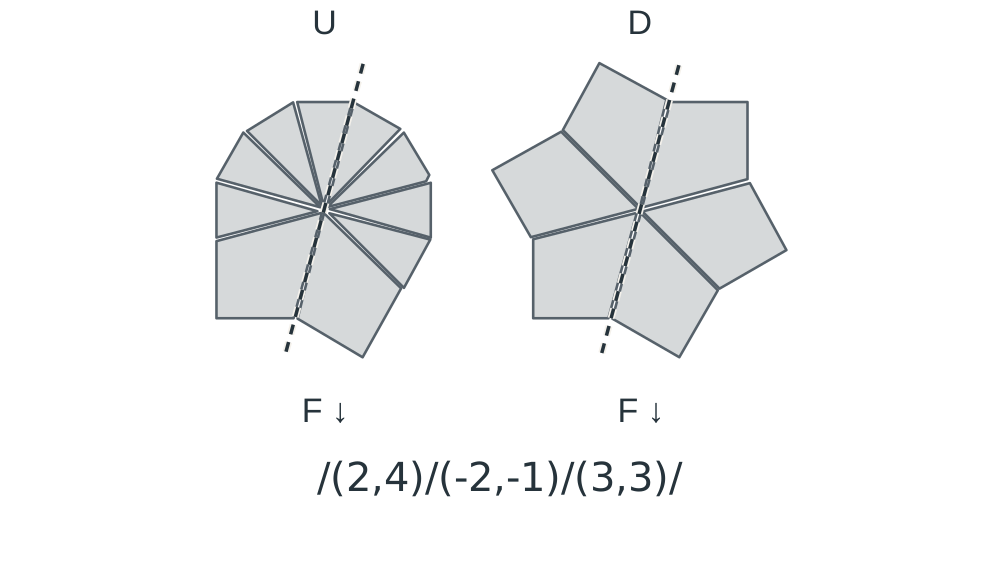
/ (2,4) / (-2,-1) / (3,3) /
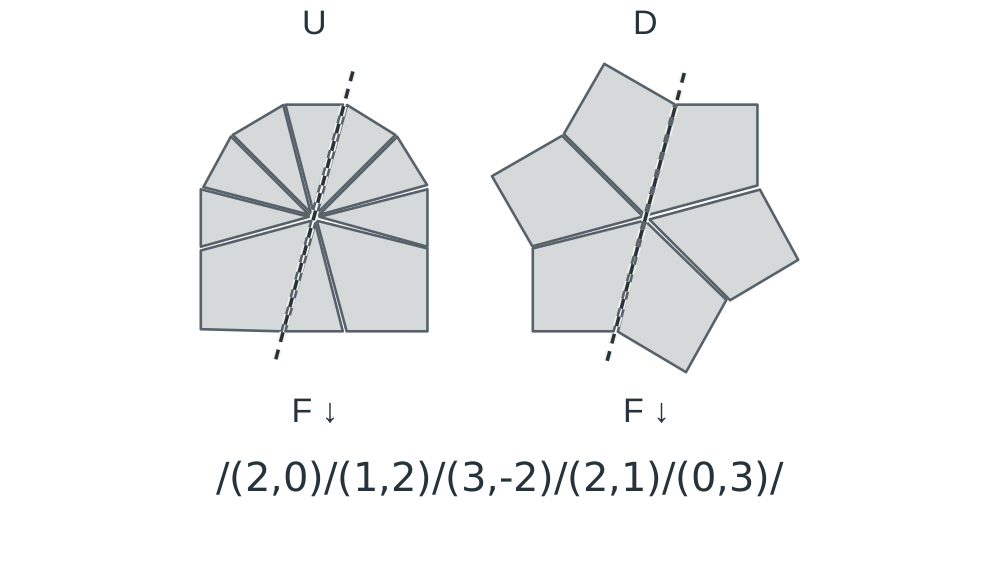
/ (2,0) / (1,2) / (3,-2) / (2,1) / (0,3) /