FTO: Bencisco and the Pyraminx Connection
The Bencisco method for FTO, with step-by-step diagrams and last-three-triples algorithms.
The FTO is becoming an official WCA event. In its June 2026 announcement ↗, the WCA confirmed that competitions may include FTO from January 2, 2027, using an average-of-five format. It is the first new event since Skewb joined in 2014.
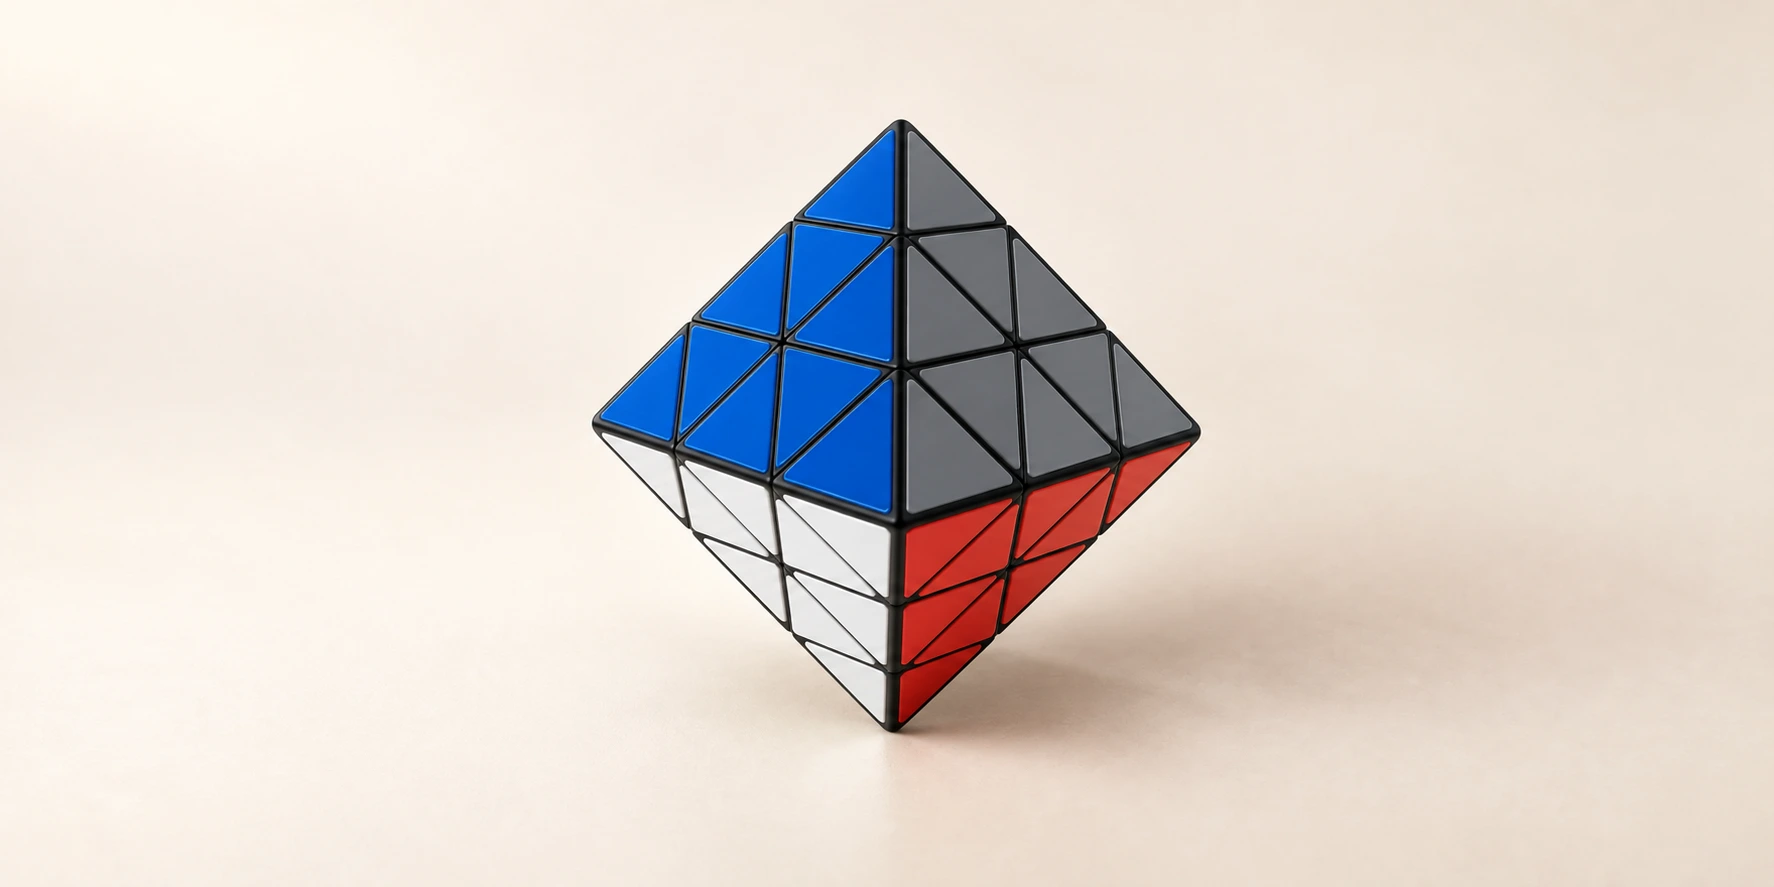
FTO stands for Face-Turning Octahedron. Its eight faces are triangular, and each face turn is 120°. This guide uses Ben Streeter’s Bencisco method: organize individual pieces into centers and triples, then finish the last three triples.
1. Piece and group names
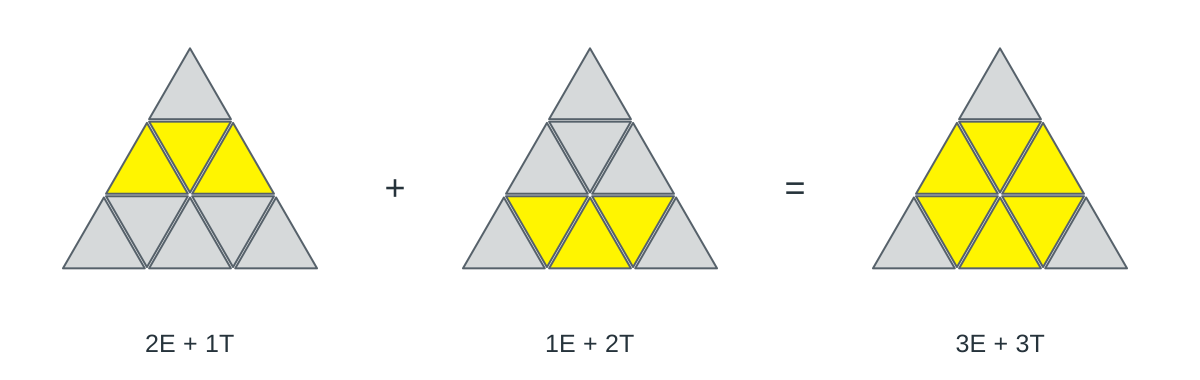
An FTO has three piece types: 6 corners with four colors each, 12 edges with two colors each, and 24 triangles with one color each. Corners have two orientations, separated by a 180° flip. Edges do not have an independent flip to solve.
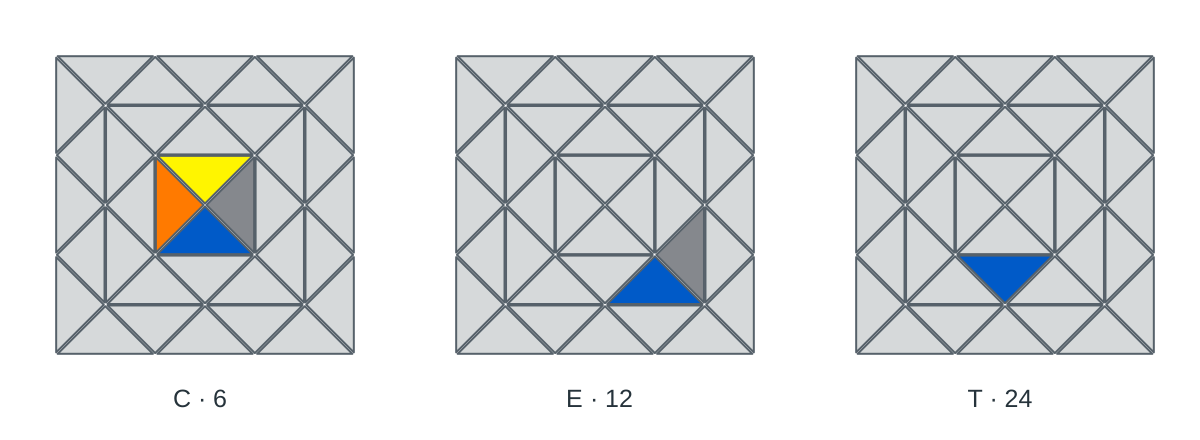
Bencisco organizes these pieces into two larger units.
| Group | Pieces | Role |
|---|---|---|
| Center | Three edges and three triangles forming a hexagon | Establish the color order and a reference for later steps |
| Triple | One corner and two triangles on opposite sides of it | Pair, flip, and place as a unit |
A “center” here means the hexagonal group. The three corner tips of a face are outside it. A triple’s triangles sit on opposite sides of its corner and match the adjacent corner stickers. In the diagram, the yellow and blue triangles belong to the same corner.
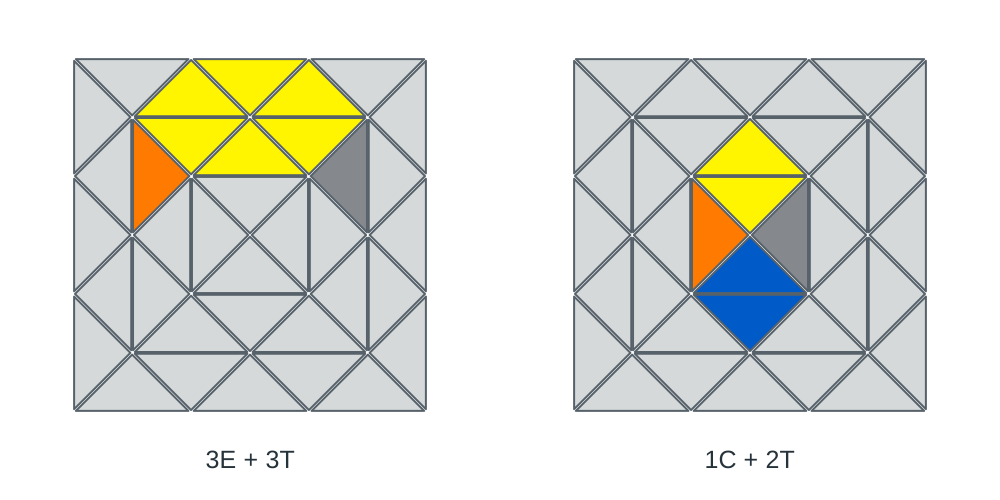
Only four such centers are needed. Together they use all 12 edges; the six triples use all 6 corners. The triangles belong to two separate orbits, each containing four colors. Once one color group supplies the centers, the other supplies the triples.
2. Notation and grip
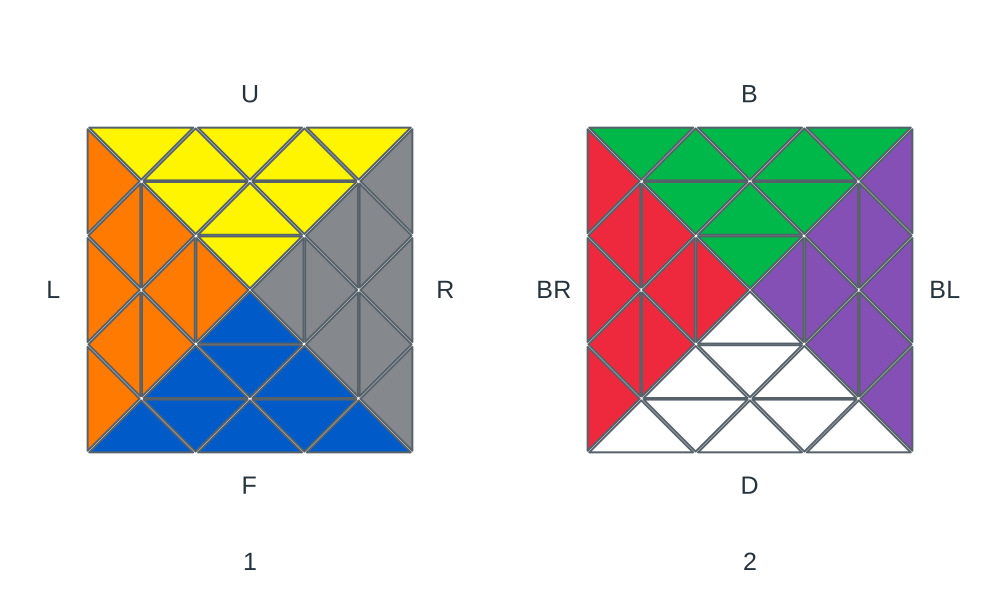
This guide uses corner-in-front notation. Point a vertex directly toward you. The four visible faces are U above, R to the right, F below, and L to the left. The other faces are B, BL, D, and BR. The left diagram is the front view; the right is the rear view after turning the entire puzzle 180° sideways while keeping the same upward direction.
| Notation | Action |
|---|---|
R, U, etc. | Turn that face 120° clockwise, looking directly at it |
R', U', etc. | Turn that face 120° counterclockwise |
Rw | Turn R and the adjacent middle slice together by 120° |
Uo | Rotate the entire puzzle 120° clockwise around the U axis to change the viewing angle |
S⁻¹, H⁻¹ | Reverse the trigger’s move order and invert every move |
After a regrip, letters refer to faces in the current grip. Judge clockwise from the face being turned. Later diagrams use the same front and rear views. Light gray pieces can be ignored for the current task. Each recognition diagram shows the state before its algorithm.
Two basic triggers: S and H
S stands for Sledgehammer and H for Hedgeslammer. Throughout this guide:
S = R' L R L'
H = R B' R' B
S⁻¹ = L R' L' R
H⁻¹ = B' R B R'
Both S and H cycle the three triples around U and flip two of them while preserving the hexagonal centers. Their cycle directions differ. H and S⁻¹ are different algorithms in this grip, so use the definitions above.
3. First center
Choose a color and gather its three edges and three triangles. A useful division is a large trapezoid plus a small trapezoid. The large one contains two edges and one triangle; the small one contains one edge and two triangles.
Start with an edge next to a matching triangle, then attach a second edge to the other side of that triangle. Move the completed large trapezoid together onto a face you can leave alone. Build the small trapezoid around the remaining edge, then join the two groups. Before each insertion, inspect the joining boundary and keep completed groups inside a single moving layer.
Once the hexagon is one color, check the order of the edges’ side colors. The FTO has no fixed centers. Find a corner containing your chosen color and use its two adjacent side colors to establish the relative positions of two edges. The third edge follows. This gives the center the correct color order for the triples you will attach next.
4. First two triples: add two corners
Place the first center on BL and use the right side as your pairing area. Find a corner containing the first-center color and the two triangles that belong on opposite sides of it. Attach one triangle to its matching corner sticker, move the pair inside a single layer to preserve it, then attach the second triangle.
Insert the completed triple beside the first center, checking that its side colors also match the center’s edges. Repeat for a second triple. Finish in the position below: the first center remains on BL, the two completed corners are at the bottom, and the corner nearest U stays open.
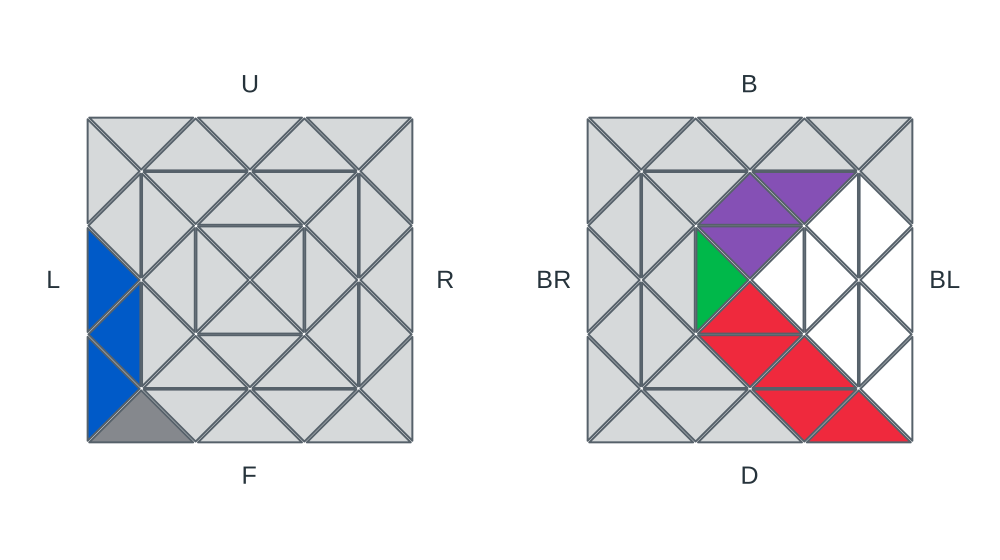
This gap leaves U, R, and Rw available for building the remaining centers. Put the completed triples in these positions before continuing so that you can use a consistent working area.
5. The remaining three centers
Second center
Build another large and small trapezoid around U and R. When you need a different working face, bring it to the top with Rw and use U to position the pieces. Keep completed trapezoids inside one layer, then restore any groups temporarily moved aside during an insertion.
After building the second center, align its side colors with the first center and completed triples. Use Rw to place it on BR. The remaining two centers are then built mainly on F and U.
Last two centers
Build a large trapezoid on F and place it within the middle slice parallel to R. Form the remaining small trapezoid during its insertion: put one target triangle in the opening on F, then position the remaining edge and triangle on U so that bringing up the first triangle with R joins the pieces. Finish by restoring R.
Keep the white center on BL and the green center on BR for the following R U R' insertion. R opens the slot into the working layer, U brings in the target pieces, and R’ restores the displaced section. The opposite insertion uses R U' R'; arrange the pieces for the chosen direction first.
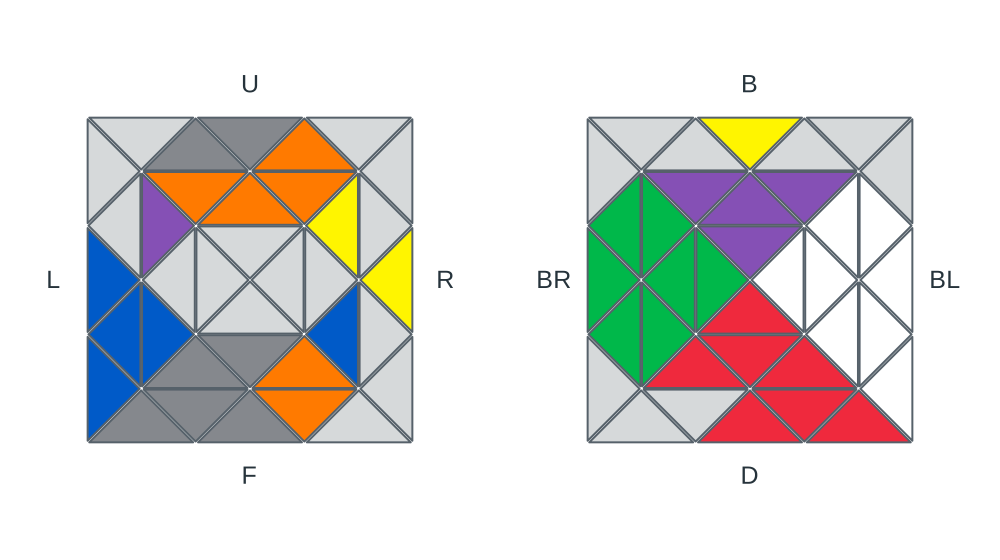
R U R'
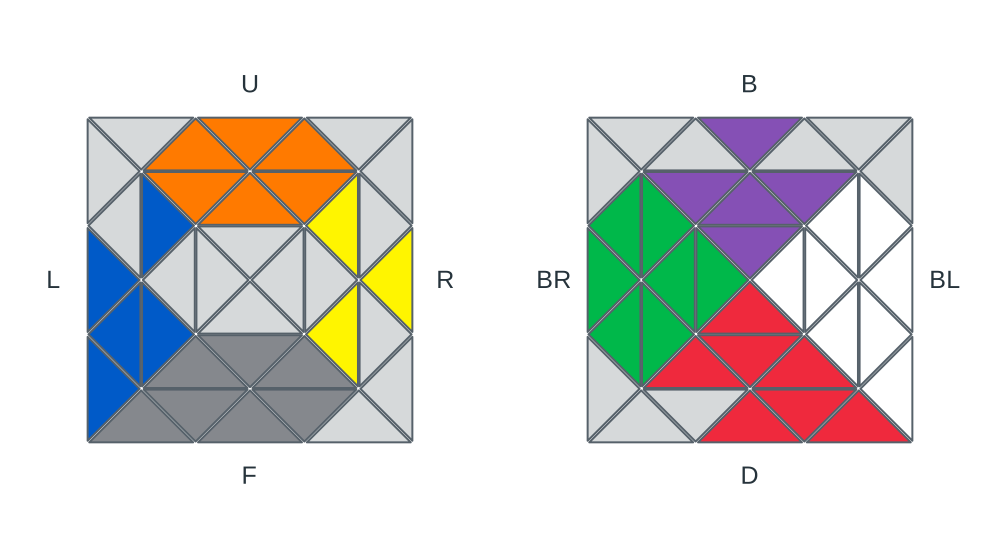
Sometimes the target pieces are already adjacent, but a direct insertion would separate them. Change how they enter the slot. This false insertion handles the pictured case; match the grip, execute the full sequence, and inspect the two centers again.
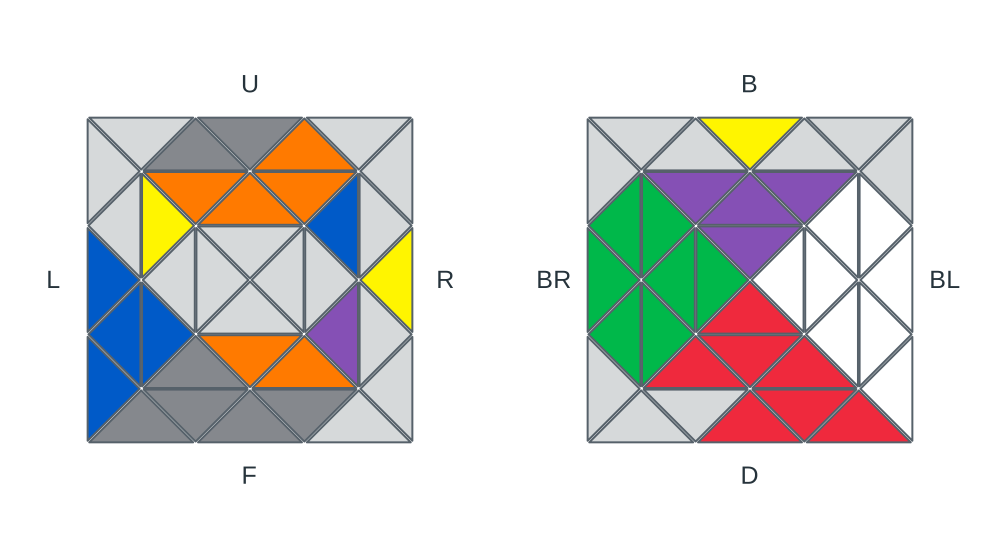
U R U' R' U' R U R'
Finishing one of the last two centers also finishes the other. Check the side-color alignment of all four centers and use U and Rw to align them with the first two triples. If this would place the last bottom corner in its slot before its triple is built, move that corner into the working area first, align the centers, then return to pairing it.
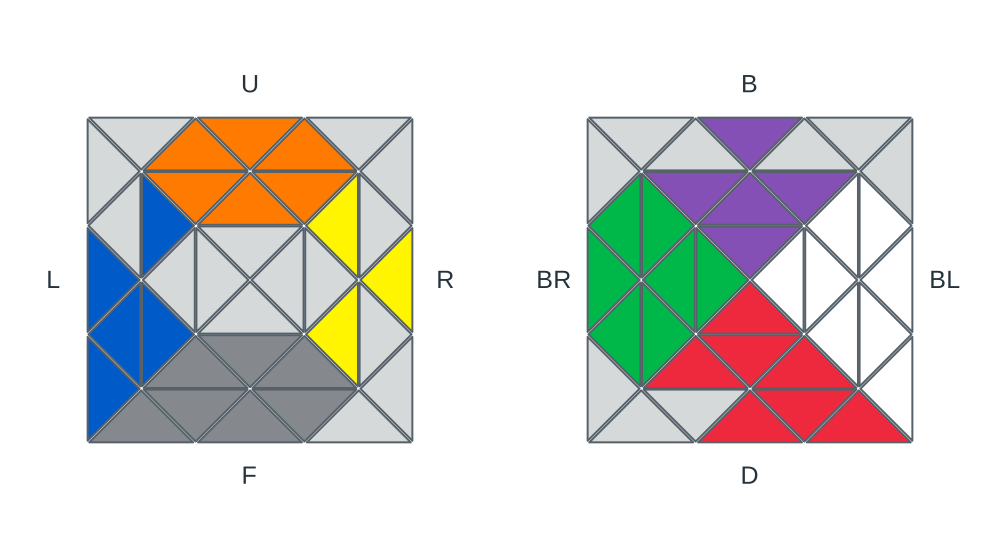
6. Last bottom triple
Rotate the whole puzzle to put white on D and yellow on U, then build the third triple beside the first center. Put its corner in the working layer and use U to bring a matching triangle beside its corner sticker. If another U would split the pair, use S or H to flip it onto the working face so that the two pieces can move together. Then pair the other side.
Once all three pieces are together, position the working layer and gap for insertion. The example below uses L R L' R': L brings out the slot, R joins the triple to it, L’ places it back, and R’ restores the working layer. If the corner is already trapped in its slot without its triangles, reverse this process to take it out before pairing.
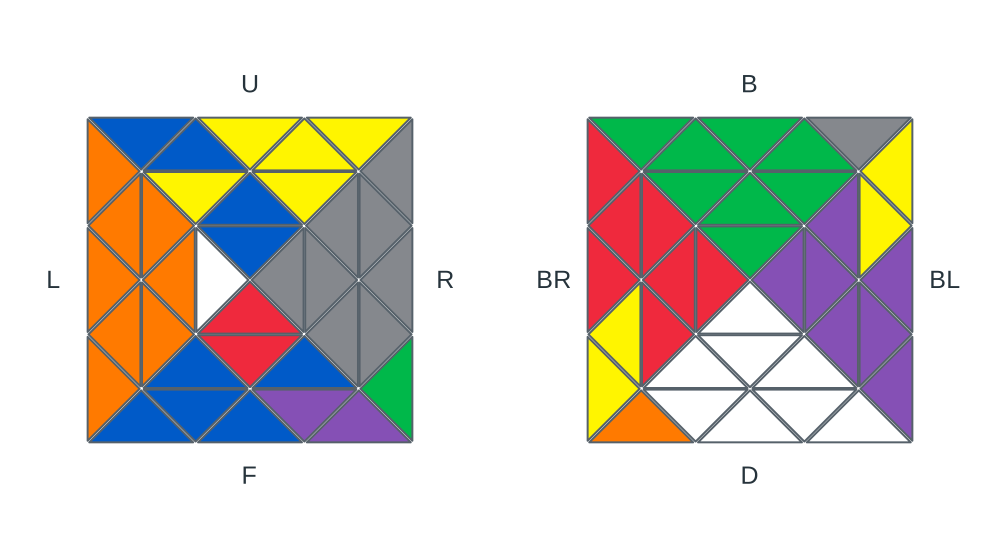
L R L' R'
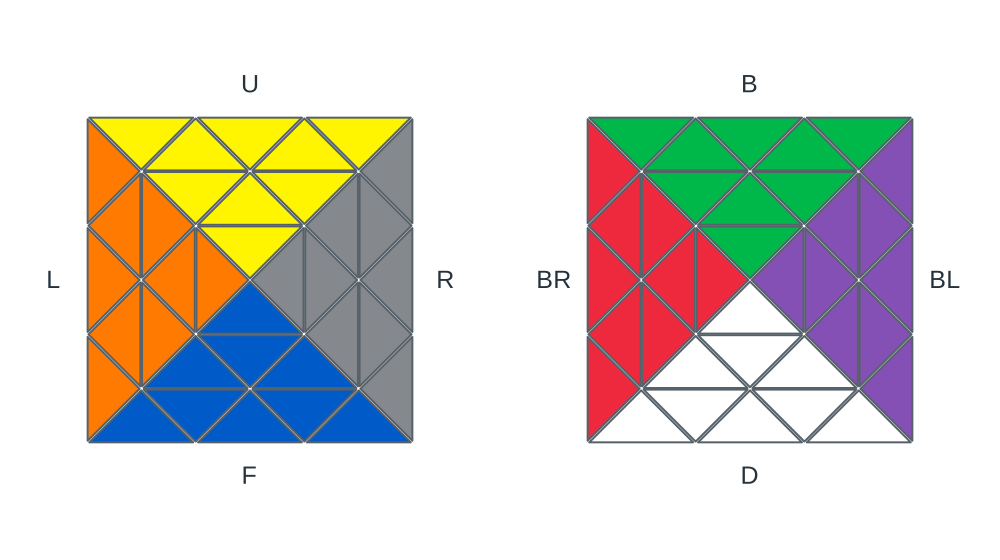
Keep the completed white layer on D and yellow on U, with the remaining three corners around U. The light gray positions below are the remaining three corners and their six triangles: L3T, or Last Three Triples.
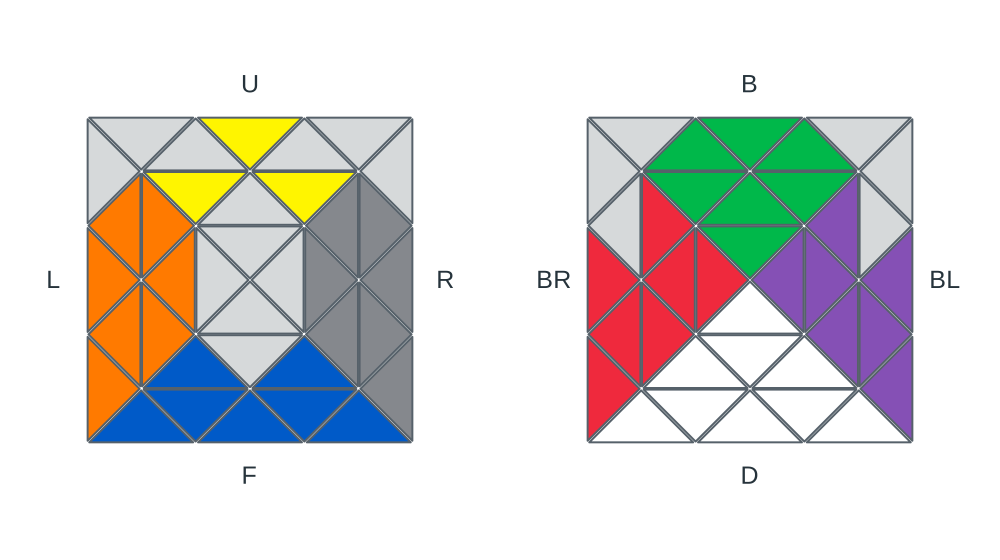
7. Solving the top layer
Truncate a tetrahedron’s four vertices at the midpoints of its edges and the result is an octahedron. The original tetrahedron’s edges sit at the octahedron’s six vertices. This gives the useful correspondence: an FTO triple behaves like a Pyraminx edge, and a hexagonal center behaves like a Pyraminx axial piece. Once these groups are complete, turning only the four center faces preserves them and moves them like a Pyraminx. This geometry underlies the original Bencisco tutorial ↗.
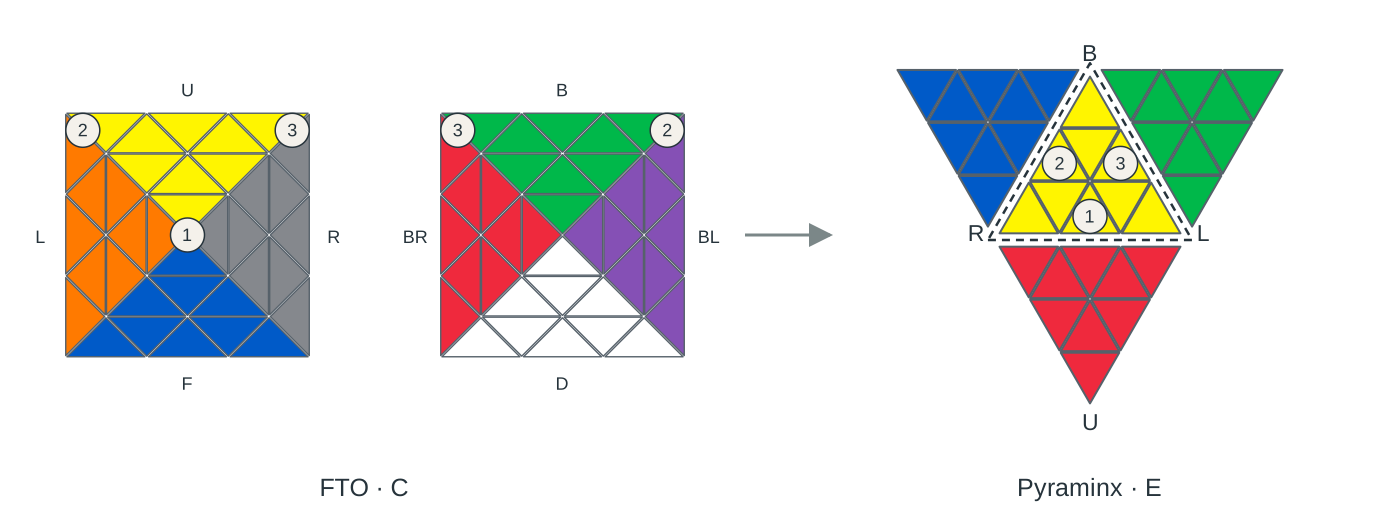
In this FTO grip, the four center faces are R, L, B, and D. Using the numbered correspondence in the diagram, they match the Pyraminx’s L, R, B, and U main turns, respectively. On a Pyraminx, keep the three solved edges around the U tip and leave the three base edges unsolved to examine the correspondence.
| FTO | Pyraminx |
|---|---|
| Three corners around U, with their triangles | Three remaining base edges |
| A corner flipping by 180° | An edge flipping |
| Three corners cycling | Three edges cycling |
S: R' L R L' | Sₚ: L' R L R' |
H: R B' R' B | Hₚ: L B' L' B |
An FTO U turn does not correspond to a Pyraminx U turn. FTO U is between the three corners being solved; Pyraminx U turns the main vertex at the other end. Exchange R and L in the FTO sequences to obtain the Pyraminx triggers Sₚ and Hₚ above. Below, S and H always mean the FTO triggers; substitute Sₚ and Hₚ when comparing on a Pyraminx. FTO U, used during pairing, separates and reconnects groups.
This section follows 3-Look L3T ↗: PF (Pair Formation), TL (Top Layer), and LT (Last Triangles). After pairing, solve the corners using the Pyraminx last-three-edge cases, then solve a swap or three-cycle of the remaining side triangles.
7.1 PF (Pair Formation)
Each remaining corner has a yellow sticker and a non-yellow sticker opposite it. Pair a yellow triangle with the yellow sticker and a non-yellow triangle with the opposite sticker. The two non-yellow colors may differ at this stage. A blue triangle beside a purple corner sticker is acceptable; their color order will be solved at the end.
Focus on the non-yellow triangles:
- Use U to join a non-yellow triangle on the side to a non-yellow corner sticker.
- Rotate the whole puzzle around U to put that pair where S or H can flip it upward. Preserve the pair on the U face, where subsequent U turns move its pieces together.
- Build a second pair in the same way and flip it onto U. Leave the last pair on the side and align it with U or U’.
The four diagrams below form one example: U makes a pair, H preserves it, and U’ completes the remaining pairing. The fourth diagram leads directly into the S case in the next section.
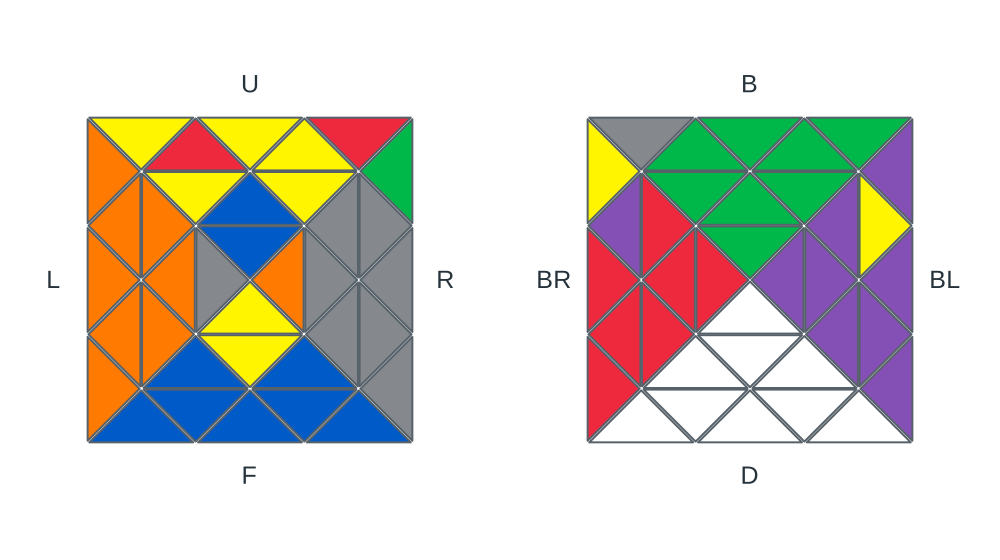
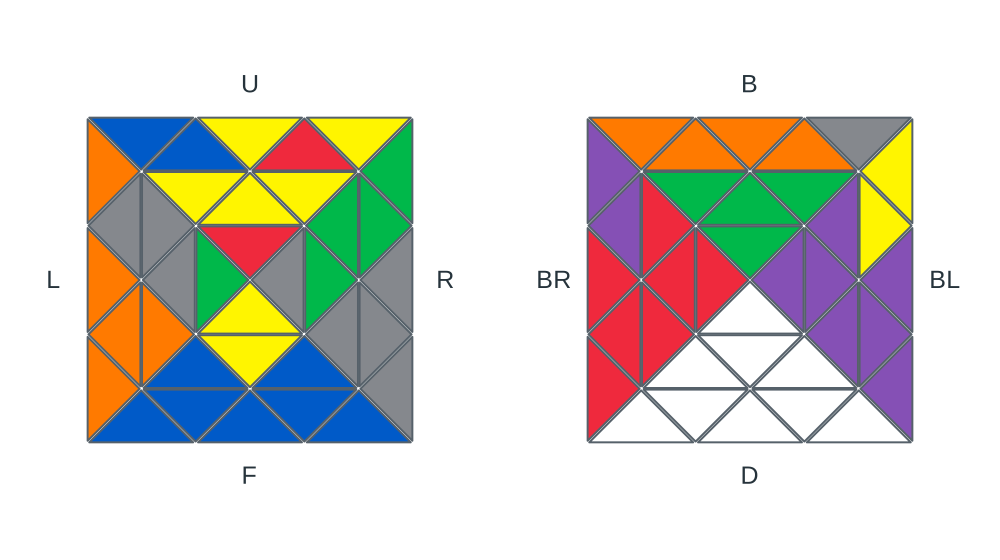
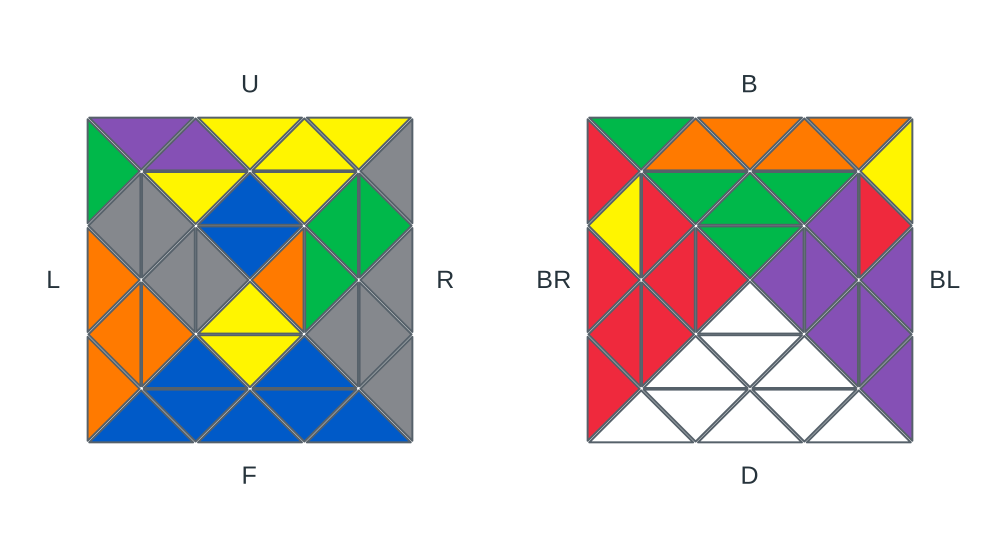
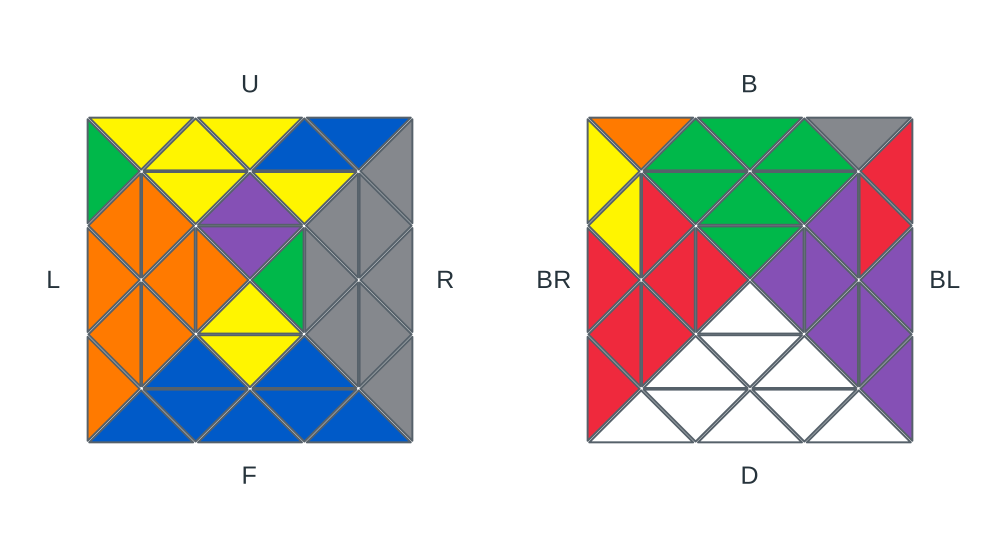
If all three non-yellow triangles end up on U while the final pair remains unfinished, rotate the whole puzzle around U to put the unpaired triangle beside the corner pointing toward you. Apply S to bring that triangle back to the side. Preserve the remaining top pair, use U to adjust the side pairing, and continue the pairing-and-flipping process.
7.2 TL (Top Layer)
After pairing, S and H move each corner together with its two adjacent triangles. You can now recognize the same five cases as the Pyraminx’s last three edges: two cycles with flips, a double flip, and two pure three-cycles.
First check the centers. If U turns during pairing have left them misaligned, orient all the yellow corner stickers onto U before realigning them. When two yellow stickers face sideways, rotate the whole puzzle around U to put those corners at positions 2 and 3 in the double-flip diagram, then execute H S. With every yellow sticker on U, turn U to align the centers and identify the remaining corner cycle. This U adjustment preserves the yellow-to-yellow pairing.
When the centers are already aligned, match one of the five paired cases directly. Position 1 is the corner pointing toward you, 2 is the rear-left corner, and 3 is the rear-right corner. Positions 2 and 3 exchange sides in the rear view. Use the completed centers to identify each corner’s destination number; the same recognition works with a different physical color scheme. Rotate the whole puzzle around U to match the diagram, then execute its algorithm. The side triangles only need correct yellow/non-yellow pairing; their individual side colors may differ from the examples. Use the corners’ color arrangement to distinguish S from H and the two cycle directions.
Each pair places the FTO beside its Pyraminx counterpart. Corners and edges with the same number have matching destinations and flips. Both diagrams show the state before the algorithm. The Pyraminx uses a net of four triangular faces, with its bottom face in the center. Edge 1 is at the bottom of this central triangle, and edges 2 and 3 are at the upper left and upper right, matching the FTO positions. Dashed lines mark the folds between the central bottom face and the three side faces.
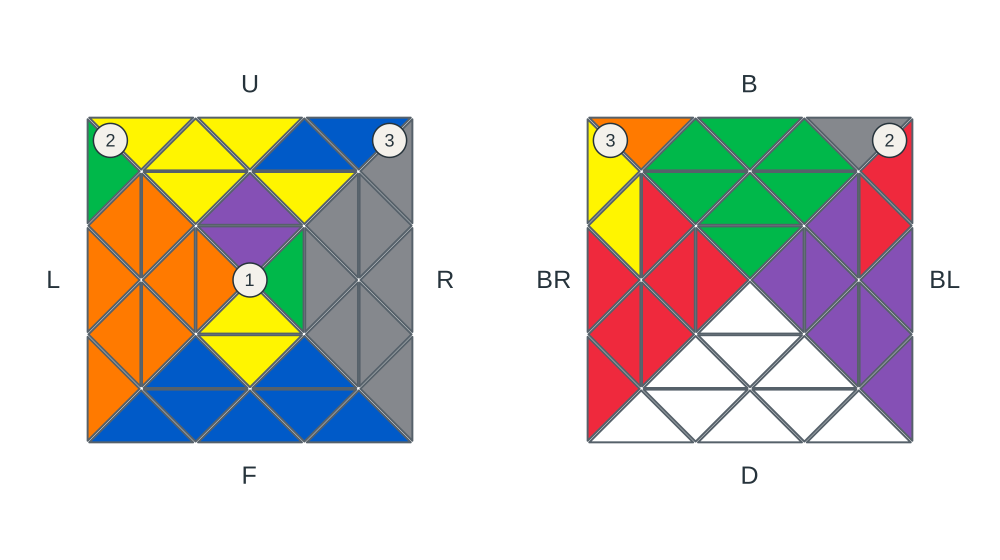
S
Corners 1 and 3 are flipped. The corners at positions 1, 2, 3 belong at 2, 3, 1.
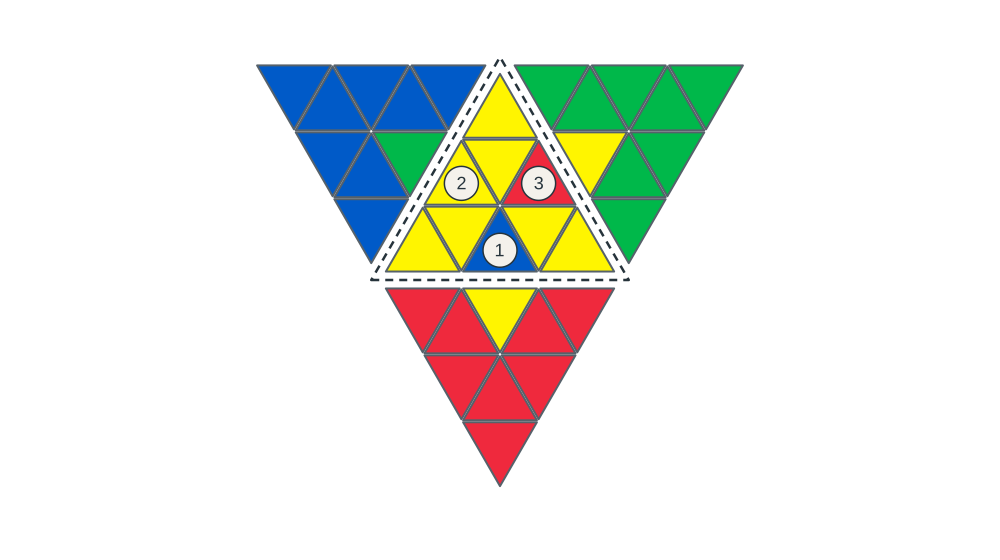
Sₚ
Edges 1 and 3 are flipped. The edges at positions 1, 2, 3 belong at 2, 3, 1.
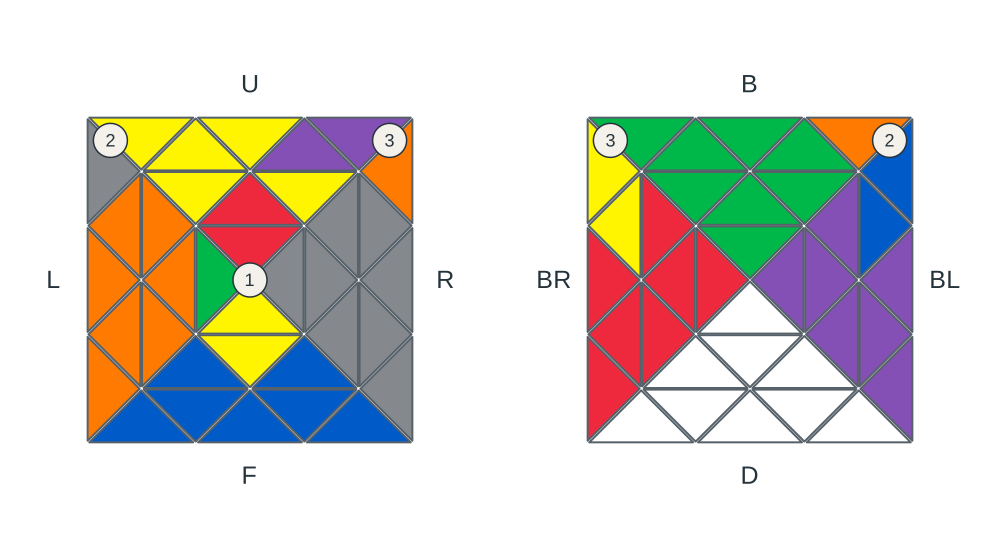
H
Corners 1 and 3 are flipped. The corners at positions 1, 2, 3 belong at 3, 1, 2.
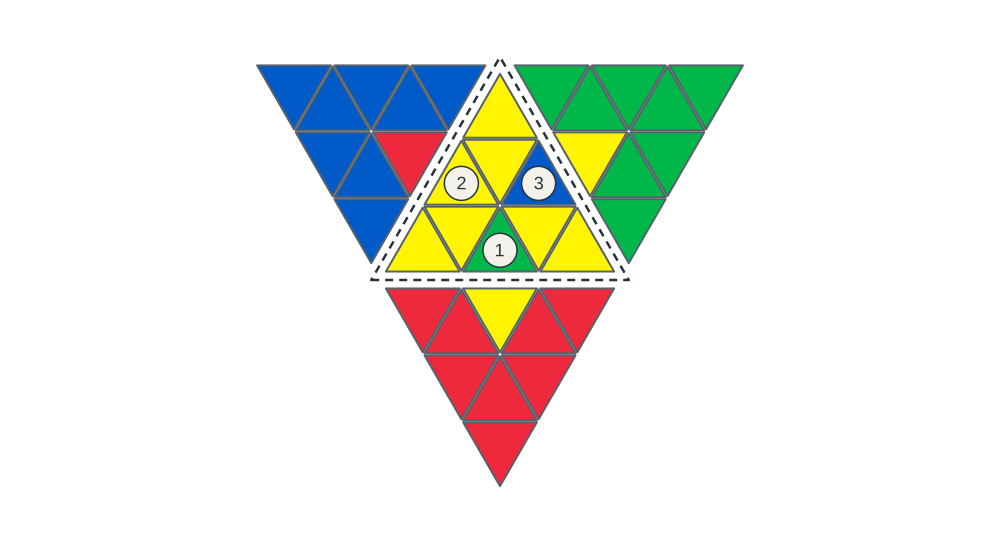
Hₚ
Edges 1 and 3 are flipped. The edges at positions 1, 2, 3 belong at 3, 1, 2.
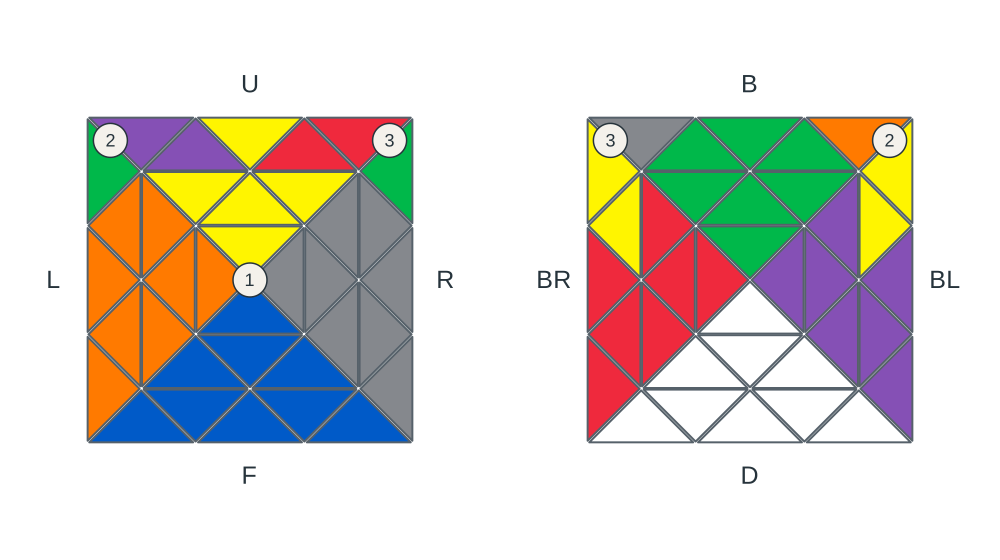
H S
All three corners are in position; the yellow stickers at 2 and 3 face sideways.
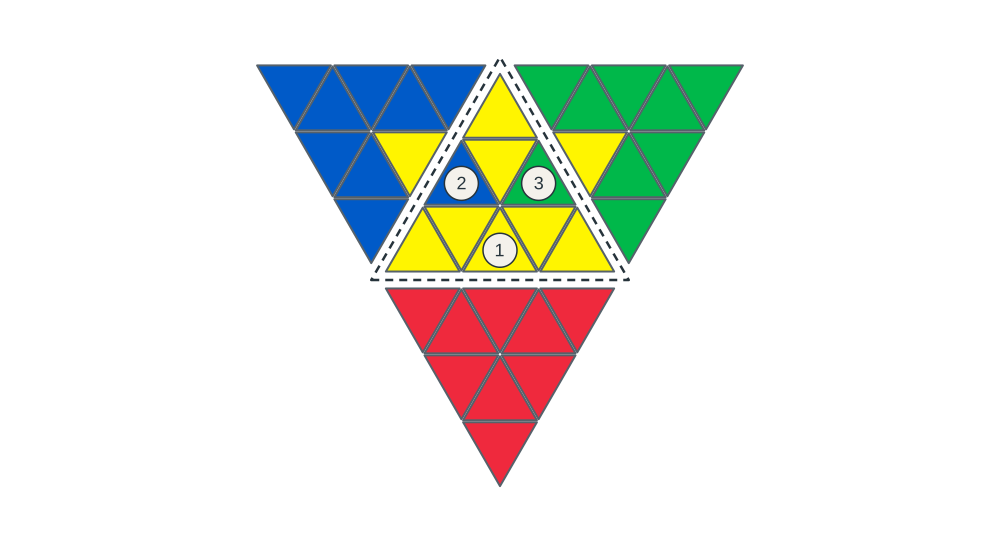
Hₚ Sₚ
All three edges are in position; the yellow stickers at 2 and 3 face sideways.
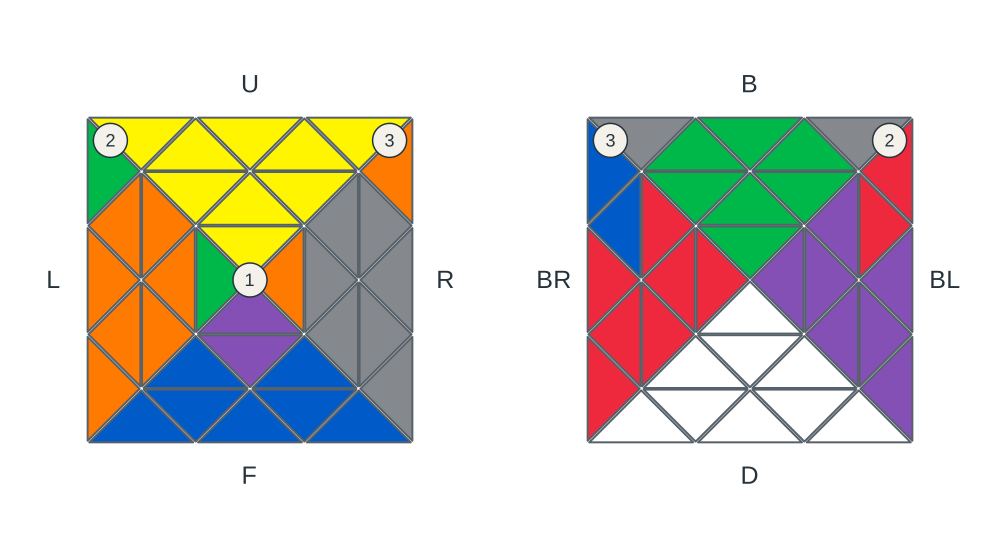
S⁻¹ H
All yellow stickers face U. The corners at positions 1, 2, 3 belong at 2, 3, 1.
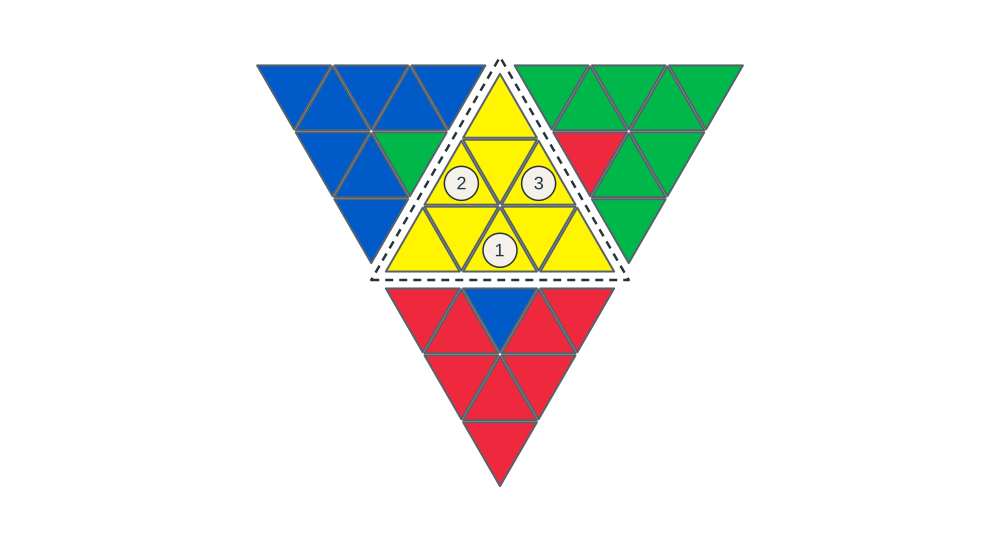
Sₚ⁻¹ Hₚ
All yellow stickers face the bottom. The edges at positions 1, 2, 3 belong at 2, 3, 1.
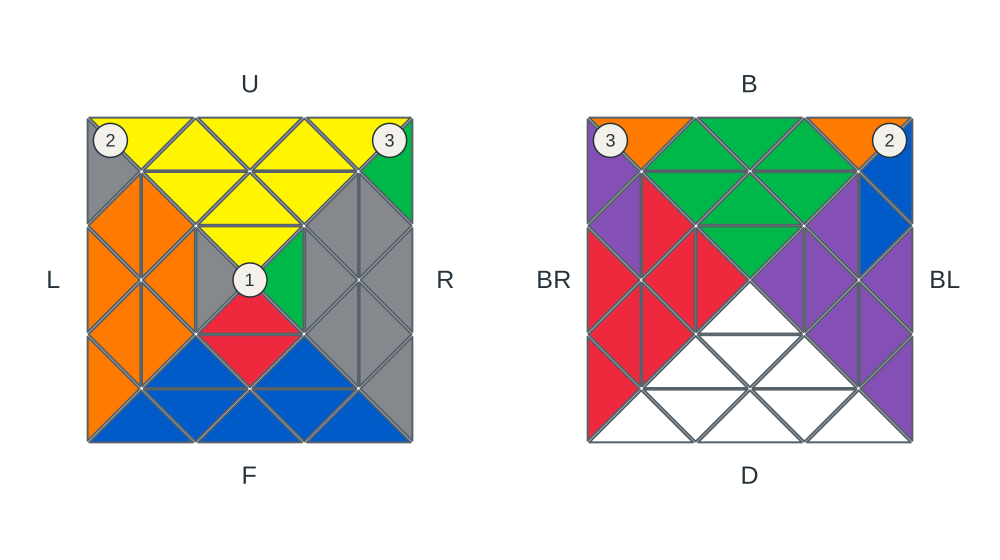
H⁻¹ S
All yellow stickers face U. The corners at positions 1, 2, 3 belong at 3, 1, 2.
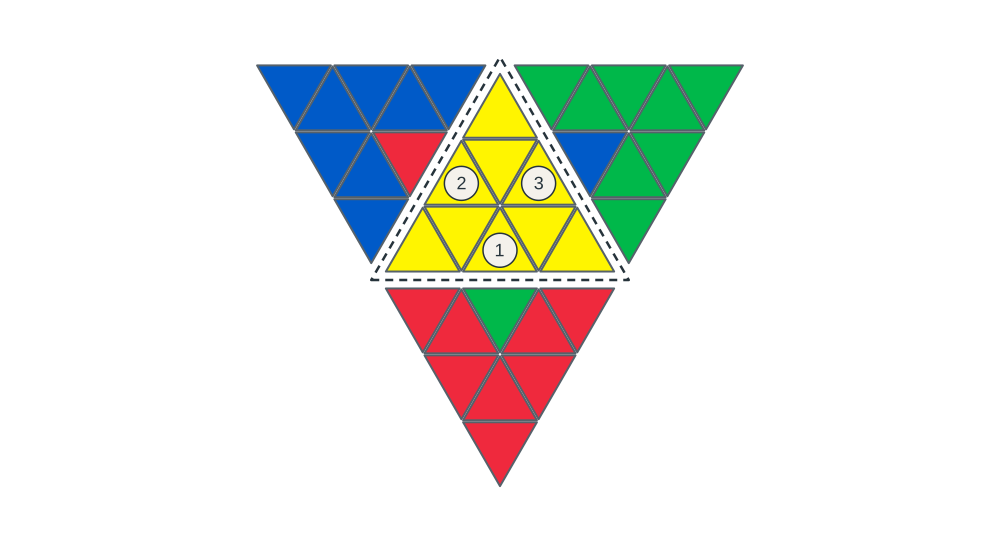
Hₚ⁻¹ Sₚ
All yellow stickers face the bottom. The edges at positions 1, 2, 3 belong at 3, 1, 2.
In each algorithm, clockwise and counterclockwise R, L, and B turns balance, restoring the axial pieces’ orientations. The FTO’s hexagonal centers are also preserved.
7.3 LT (Last Triangles)
Once the corners are solved, return the remaining side triangles to their matching faces. A two-triangle swap and either direction of a three-cycle can use OLL 28 and OLL 57 from the 3×3. Use this inverse pair from the CubeSkills algorithm sheet ↗:
OLL 28: (r U R' U') M (U R U' R')
OLL 57: (R U R' U') M' (U R U' r')
These algorithms use 3×3 hand-move notation. The grip diagrams label the upper, right, and left turning layers U, R, and L. The move r turns the two right layers together; M turns the middle slice in the same direction as the left layer. Match the grip with the original purple face toward you before executing the algorithm. Each FTO turn is still 120°.
Two-triangle swap
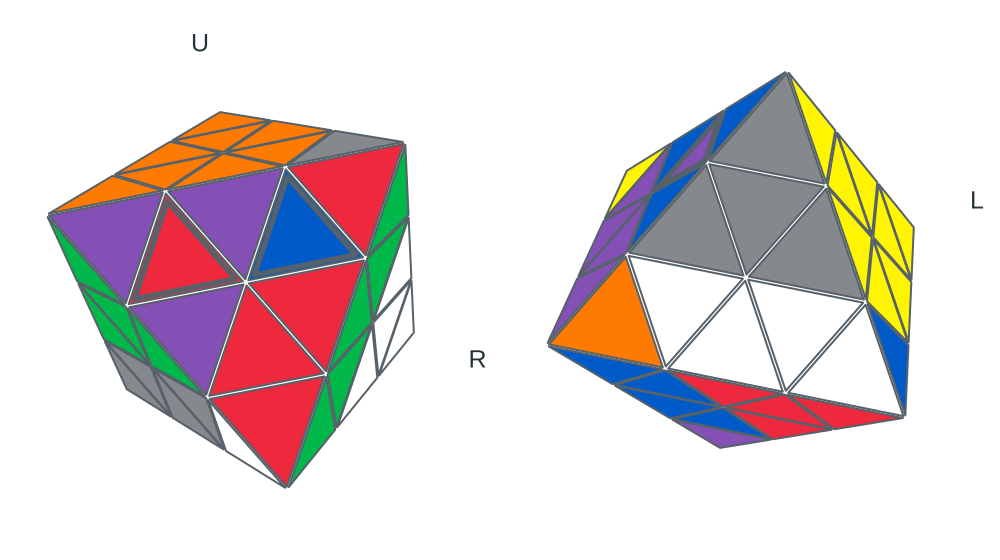
Put the original yellow top face on your left, then place the turning layer containing both swapped triangles on top. In the diagram, the blue and purple triangles need to exchange, with their shared orange turning layer above them, so here, yellow is L, orange is U, and white is R. Execute OLL 28 from this grip. The algorithm cycles another triangle of the same color along with them, so only two triangles appear to exchange.
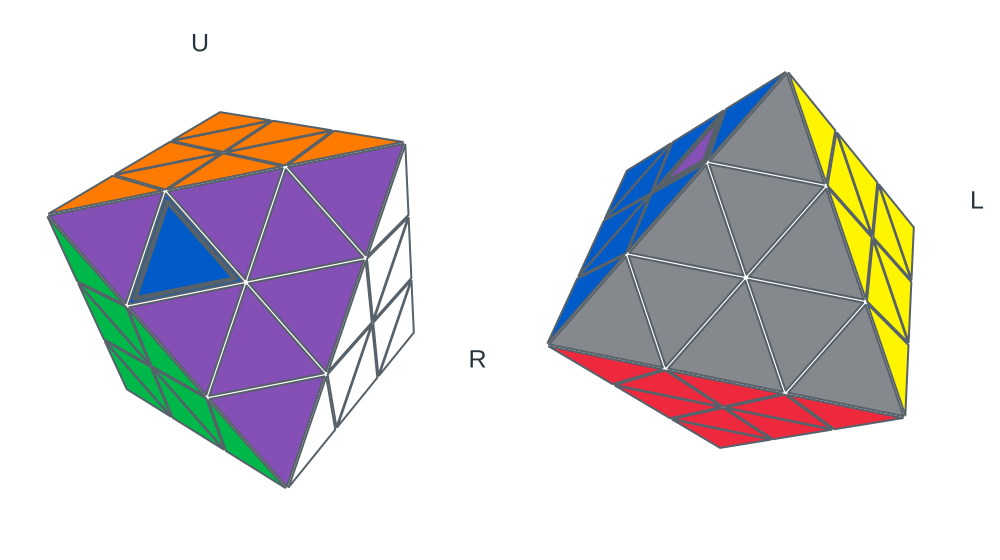
OLL 28
Left: working view. Right: rear view. Outlines mark the two triangles to exchange.
The two three-cycle directions
If all three triangles are misplaced, return to yellow on top and white underneath, then match one of the initial states below. Both cases start with the same adjustment: turn the back-right face clockwise by 120°, then turn the bottom face clockwise by 120°. Arrows 1 and 2 show the order. Keep the same grip during these turns.
Rotate the whole puzzle so the original top-face side points left and the original left-face side points up. Match the grip on the right and execute its OLL algorithm. Return to the initial grip, then turn the bottom face counterclockwise by 120°, followed by the back-right face counterclockwise by 120°. All triangles are now solved. Judge clockwise and counterclockwise while looking directly at the face being turned.
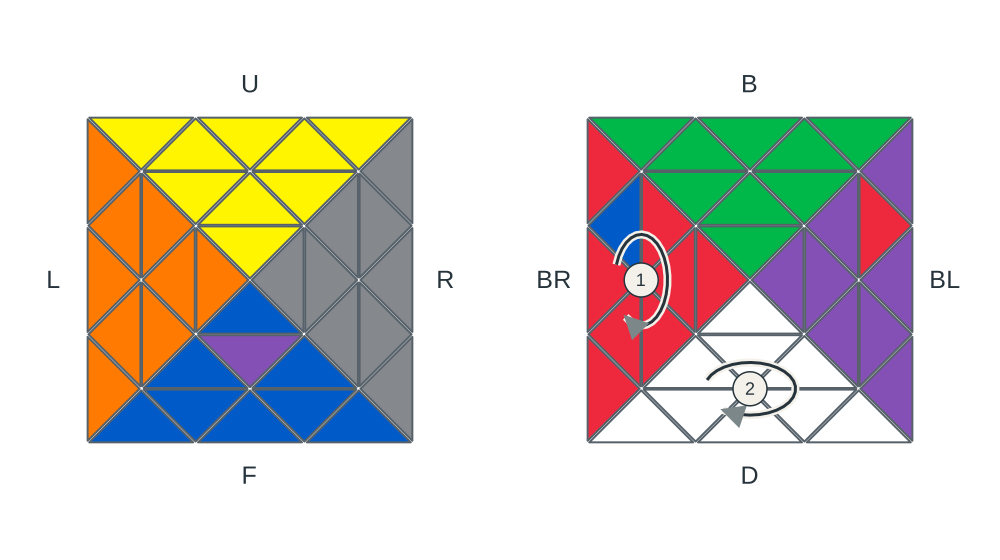
Triangle destinations: F → BL → BR → F. Follow arrows 1 and 2, then use the grip on the right.
OLL 57
After OLL, return to the initial grip. Undo the bottom turn, then the back-right turn.
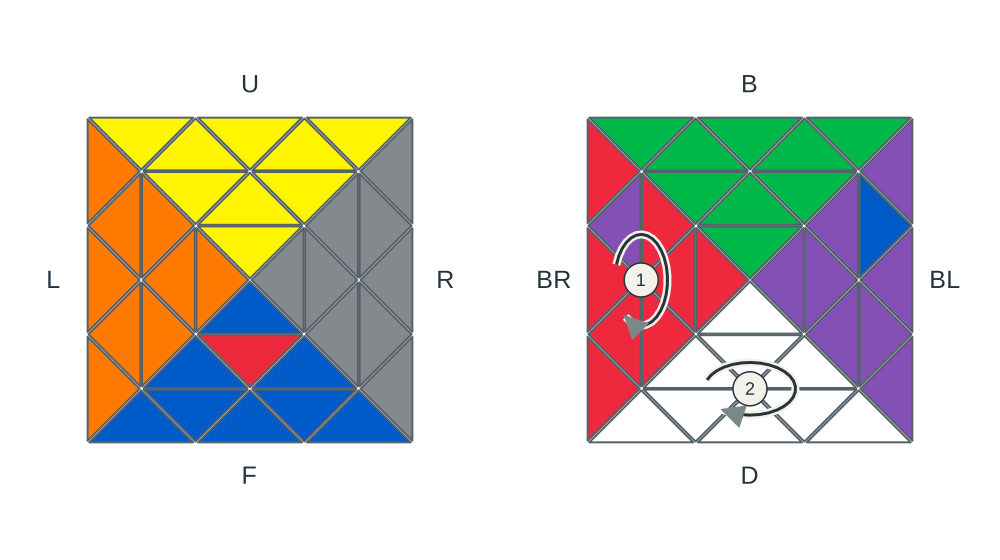
Triangle destinations: F → BR → BL → F. Follow arrows 1 and 2, then use the grip on the right.
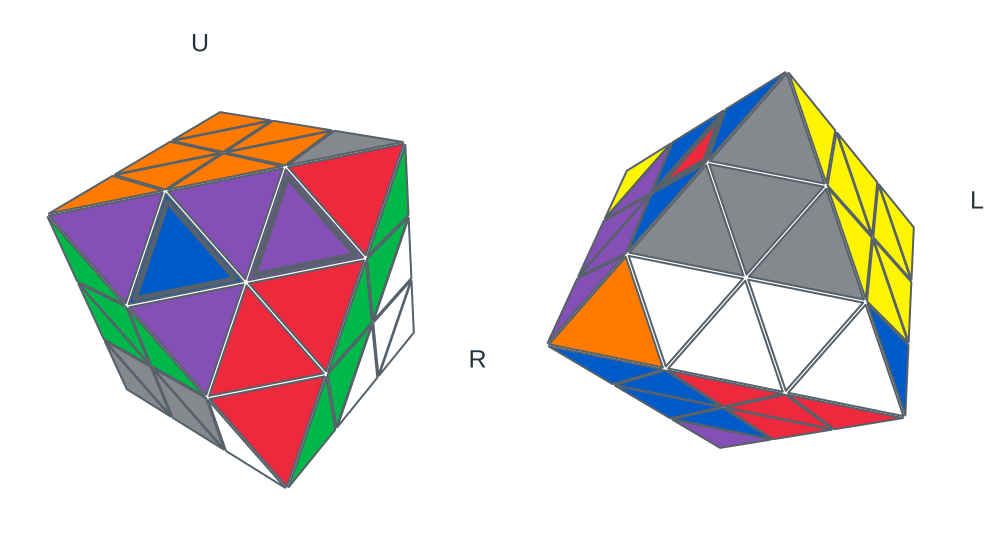
OLL 28
After OLL, return to the initial grip. Undo the bottom turn, then the back-right turn.
Once these triangles return to their faces, the FTO is solved. For a two-step finish, TCP (Triangle–Corner Permutation) ↗ solves the corners and triangles together after PF, giving PF → TCP.
References
- Ben Streeter: original Bencisco written tutorial ↗: group definitions, center construction, and the geometric connection to the Pyraminx.
- Chris Choi: FTO Tutorial for Beginners ↗: demonstrations of pairing, center insertion, and the last bottom triple.
- LowCubes: Bencisco algorithm sets ↗: PF, TL, LT, and advanced TCP. Check the grip and S/H definitions before comparing algorithms across guides.